Ever fumbled with a brand‑new Sophie remote and wondered why nothing happens when you press the buttons? You’re not alone – many of our customers with chronic pain or NDIS plans hit that snag the moment their original remote goes missing. In this intro we’ll walk through exactly how to pair a replacement adjustable‑bed remote, so you can get back to that soothing head‑up position without a hitch.
First, identify which colour remote you’ve been sent. The black‑remote models use a tiny “Pair” button hidden under the bed’s computer module, while the sleek silver units follow a power‑cycle routine. Knowing the version saves you from spending minutes trying the wrong sequence.
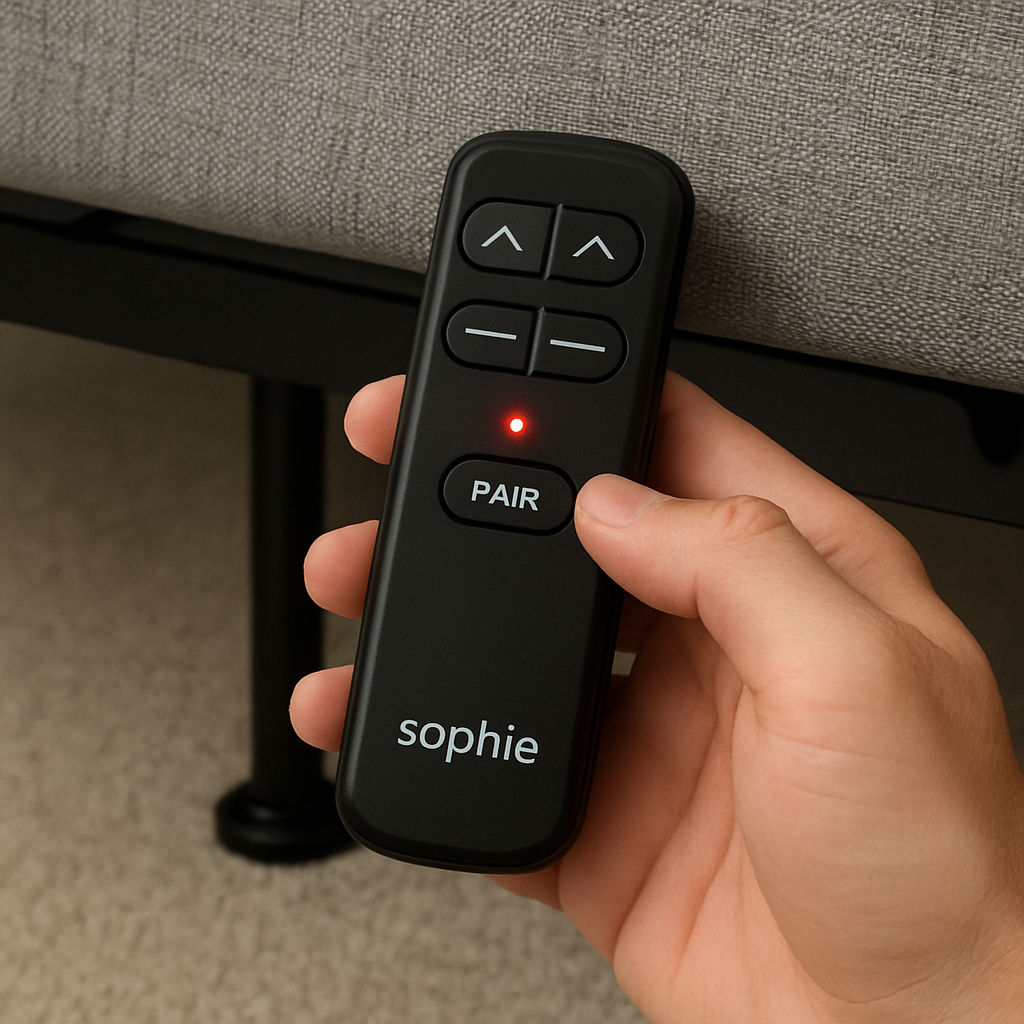
For a black remote, start by locating the Pair button on the underside of the bed frame – it’s usually near the motor housing. Press it once; you should see a white LED flash rapidly. Next, hold down the SW (Switch) button on the remote for about eight seconds until the whole remote starts flashing back at you. As soon as the flash stops, press and hold the “Head Up” button; you’ll hear a clear beep confirming the bed has accepted the signal. Finally, double‑check that the white LED under the bed has stopped flashing – if it’s still blinking, repeat the steps.
Silver remotes are a bit different. Begin by turning the power off at the base and waiting at least a minute; this clears any lingering connections. Turn the power back on and watch for the under‑bed light to start flashing. Within five seconds, press and hold the Pair button at the top of the remote. Keep holding until the under‑bed light stops flashing – that’s your cue that pairing succeeded.
A quick tip from our tech team: keep the remote batteries fresh (we recommend alkaline cells) and avoid placing metal objects near the Pair button, as they can interfere with the wireless signal. If you ever lose the pairing, don’t try to re‑pair the old remote – only the brand‑new one should be used.
Need a visual refresher? Our detailed guide on resetting an adjustable‑bed remote walks you through each press and beep, making it easy to follow along while you’re standing next to the bed. How to Reset Adjustable Bed Remote: A Simple Step‑by‑Step Guide.
With these steps in hand, you can confidently pair your Sophie remote and enjoy the comfort of a custom‑positioned sleep surface – whether you’re easing back pain, supporting an NDIS therapy plan, or simply craving the perfect TV‑watching angle.
TL;DR
For a black remote, press the bed’s hidden Pair button, hold the remote’s Switch until it flashes, then press Head‑Up for a beep confirming the link.
For a silver remote, power‑off the base, wait a minute, power‑on, and hold the top Pair button until the under‑bed light stops flashing successfully.
Step 1: Prepare Your Adjustable Bed Remote and Base
Before you even think about pressing a button, take a breath and check the basics. Have you swapped batteries recently? A weak cell can make the whole pairing dance feel like a dead‑end street. We always recommend fresh alkaline cells – they give the remote the punch it needs to talk to the base.
Now, locate the remote you just received. Is it the sleek silver model or the classic black one? The colour tells you which ritual to follow, and skipping this quick check can waste a lot of time.
Black Remote – The “under‑bed” routine
Step 1: Crawl underneath the bed (you might need a flashlight) and find the tiny “Pair” button glued to the computer module. It’s usually near the motor housing. Press it once – you should see a white LED flash rapidly. That flash is the bed saying, “I’m listening.”
Step 2: Grab the remote and hold down the SW (Switch) button for about eight seconds. The whole remote will start flashing back at you. If it doesn’t, double‑check the batteries.
Step 3: Release the SW button, then immediately press and hold the “Head‑Up” button. You’ll hear a loud beep – that’s the confirmation tone that the bed has accepted the signal.
Step 4: Look back at the underside of the bed. The white LED should have stopped flashing. If it’s still blinking, repeat the steps; sometimes the bed needs a second “hey, are you sure?”
Silver Remote – The power‑cycle dance
Step 1: Turn the power off at the base. Wait at least one minute – this clears any lingering connections and gives the electronics a breather.
Step 2: Flip the power back on and watch for the under‑bed light to start flashing. That flash means the bed is ready to pair.
Step 3: Within five seconds of the power‑on, press and hold the Pair button at the top of the remote. Keep holding until the under‑bed light stops flashing. When it steadies, you’ve nailed the pairing.
That’s it – the remote should now respond to every press, letting you find that perfect head‑up angle for a good night’s sleep.
If you hit a snag, you might find a visual walkthrough helpful. Below is a short video that walks you through each press and beep, so you can follow along while you’re right next to the bed.
After watching, give the steps another go. Most of our customers tell us that seeing the flashing LED and hearing the beep in real time makes the whole process feel less like a mystery and more like a quick tech‑check.
Looking for a deeper dive? Our How to Reset Adjustable Bed Remote: A Simple Step‑by‑Step Guide covers troubleshooting if the remote still won’t pair after a few tries.
Pairing your remote isn’t just a one‑off task – it’s the first step toward a healthier sleep routine. Many of our NDIS participants combine the adjustable‑bed positions with daily stretching or guided breathing, and they track their progress using the wellness plans from XLR8well. Integrating the bed into a broader health program can amplify pain relief and improve overall well‑being.
And if you love a fully connected bedroom, consider checking out Plug & Carry’s smart home gadgets. A universal remote hub or Bluetooth adapter can let you control lights, speakers, and even the bed from a single interface – perfect for caregivers who want to minimise the number of devices on the nightstand.
Pro tip: keep the remote and the Pair button free from metal objects or thick blankets during the process. Metal can interfere with the wireless signal, and a blanket can block the LED’s view.
Once you’ve confirmed the pairing, sit back, press “Head‑Up”, and feel that gentle lift. That moment of relief is exactly why we spend time perfecting these steps – to get you back to a restful position without the frustration of a non‑responsive remote.
Step 2: Activate Pairing Mode on the Bed Base
Now that your remote is good to go, the next thing you have to convince the bed to listen is to fire up its pairing mode. Think of it like waving a flag and saying, “Hey, I’ve got a new remote, pay attention!”
Black‑Remote Bed Bases – The hidden “Pair” button
First, locate the tiny computer module tucked under the frame. It’s usually near the motor housing – you’ll spot a small recessed button labeled “Pair”. If you’re squinting, grab a flashlight; the LED next to the button will flash white like a tiny lighthouse.
Press that button once. You should see a rapid series of white blinks – three to five flashes is normal. That flash is the base’s way of saying, “I’m open for business.” If the light stays steady or doesn’t come on, double‑check that the base is plugged in and that the main power indicator is solid.
Why does this matter? In our experience, a solid, quick flash cuts down on the “ghost‑signal” frustration that many NDIS participants report when the base is still holding onto an old remote’s memory.
For people living with chronic pain, that quick handshake means less time fiddling and more time getting the head‑up position that eases neck strain. A smooth pairing also reduces the risk of accidentally activating a massage preset at the wrong moment – something a caregiver definitely wants to avoid.
Silver‑Remote Bed Bases – Power‑cycle method
Silver remotes don’t have a hidden button on the base; instead they rely on a clean power‑cycle to reset the wireless channel. Turn the base off – either unplug it or hit the power switch if yours has one. Wait at least one minute; that pause clears any stray signals lingering from the previous remote.
Plug the base back in and watch the under‑bed LED. It should start flashing, a steady strobe that tells you the base is hungry for a new link. If the light stays dark, give it a few more seconds – sometimes the base needs a moment to boot up.
Once the flash appears, you have five seconds to hit and hold the Pair button on the top of the silver remote. Keep the button pressed until the under‑bed light stops flashing. You’ll often hear a soft click from the remote; that’s the audible cue that the handshake succeeded.
Real‑world tip: Sam, a caregiver for his dad who uses a Sophie bed, always times his hold with a kitchen timer. He says the timer takes the pressure off “guess‑work” and makes the whole thing feel less like a guessing game.
Quick checklist before you move on
- Base is plugged in and power indicator is solid.
- LED under the bed is flashing (black remote) or starts flashing after power‑on (silver remote).
- Pair button on the base (black) or remote (silver) is held for the full duration.
- Listen for the beep (black) or click (silver) and watch the LED stop.
If any of those boxes stay unchecked, pause, reset, and try again. It’s surprisingly common for a stray pet toy to block the LED, or for a low‑battery remote to give a weak flash that’s easy to miss.
Battery health matters more than you might think. A remote with a fresh set of alkaline cells will flash brightly and hold the “SW” press for the full eight seconds. If the light flickers or the remote feels sluggish, swap the batteries before you start the pairing dance.
Metal objects near the Pair button can also interfere with the wireless signal. Keep jewelry, watches, or metal‑rimmed glasses away from the base while you’re pressing the button – a simple habit that saves a lot of head‑scratching later.
Once the base’s pairing mode is active and you’ve completed the remote side of the dance, you’ll know you’re good because the LED will go dark and the remote will respond instantly to a simple “Head‑Up” press. That’s the moment you feel the bed lift – and you know you’ve just saved yourself a frustrating support call.
And remember: this whole routine only applies when you’ve received a brand‑new remote. Trying to re‑pair an old remote can confuse the base and leave you with a blinking light that never stops. If that happens, start over with the fresh remote and follow the steps exactly as laid out.
With the base now listening, you’re ready to explore all those preset positions – zero‑gravity, massage, anti‑snore – that Sophie beds are famous for. But that’s a story for the next step.
Step 3: Sync the Remote with the Bed Base
Now that the base is listening, it’s time to actually get the remote to talk to it. If you’ve ever stared at a silent bed wondering why nothing moves, you know the frustration – especially when you’re dealing with chronic pain or helping a loved one with an NDIS plan. Let’s make sure the handshake is crystal‑clear.
First, double‑check that the white LED under the bed has either stopped flashing (black remote) or is still flashing (silver remote) – that’s your visual cue that the base is ready for the final push. If the light looks fuzzy or you can’t see it, grab a flashlight; a clear LED means the bed’s radio is awake and waiting.
Black‑Remote Sync Steps
1. After you’ve held the SW button for about eight seconds and heard the remote start flashing, release it immediately.
2. Press and hold the Head‑Up button. You should hear a loud, unmistakable beep – that’s the bed confirming it’s received the signal.
3. Look back under the bed. The white LED should now be dark. If it’s still blinking, repeat the SW‑then‑Head‑Up sequence; sometimes a quick second try clears a missed packet.
Tip: Keep the remote level in your hand and avoid covering the antenna area (the little metal strip on the back). A slight wobble can drop the signal, especially if you’re seated on a wheelchair or leaning over the bed.
Silver‑Remote Sync Steps
1. With the base powered back on, you’ll see the under‑bed LED flash. Within five seconds, press and hold the Pair button on the top of the remote.
2. Hold it until the flashing stops – you’ll often feel a tiny click in the remote’s housing. That click is the silent confirmation that the base has locked onto the remote.
3. Test the connection by pressing any movement button (Head‑Up, Foot‑Down, or Massage). The bed should respond instantly.
Pro tip: Set a kitchen timer for one minute after you power off the base. The pause clears any stray signals and gives you a reliable window to hit the Pair button without rushing.
Quick Checklist Before You Move On
- Base LED status matches the remote type (off for black, flashing then off for silver).
- Heard the beep (black) or felt the click (silver).
- Remote responds to a single button press.
- Batteries are fresh – a weak cell can cause the remote to stop flashing early.
If anything feels off, pause, swap the batteries, and try the sequence again. In our experience, a fresh set of alkaline cells is the difference between a smooth sync and a half‑hour of head‑scratching.
Need a visual walk‑through? The video below walks you through the exact moment you should hear the beep and see the LED go dark.
For a broader perspective on remote syncing across different brands, you can also check the Sven & Son remote syncing guide. The fundamentals are the same – a clear LED, a beep or click, and a responsive bed.
| Remote Type | Sync Action | Key Indicator |
|---|---|---|
| Black | Release SW, hold Head‑Up | Beep + LED goes dark |
| Silver | Hold Pair button within 5 s of power‑on | Click + LED stops flashing |
| All | Test any movement button | Immediate bed response |
Once the remote is synced, you’re ready to explore all those preset positions – zero‑gravity, massage, anti‑snore – without a single hiccup. Enjoy the freedom of a bed that listens, and remember: never try to re‑pair an old remote; a fresh remote means a fresh start.
Step 4: Test Functions and Troubleshoot Common Issues
Now that you’ve paired the remote, the next question is – does it actually move the bed? This is where a quick functional test saves you an afternoon of head‑scratching.
Black‑Remote: Verify the basic motions
First, press the Head‑Up button. You should feel the head‑end lift and hear that loud beep you heard during pairing. If the bed stays still, double‑check that the white LED under the frame is completely off – a lingering flash means the base is still in pairing mode.
Next, try the Foot‑Down button. The foot‑end should lower smoothly. A stutter or no movement usually points to a weak battery. Swap the cells, press the SW button again for a full eight‑second flash, and repeat the test.
Finally, hit the Massage preset (if your model has it). The vibration should kick in within a second. If it doesn’t, the remote’s antenna might be covered – keep the metal strip on the back clear of your hand.
Silver‑Remote: Run the same checks
After the power‑cycle and pair press, press any movement button – Head‑Up, Foot‑Down, or even the “Zero‑Gravity” shortcut if you have one. The bed should respond instantly. If you notice a delay, wait a moment; the base sometimes needs a second to finish the handshake.
Test the Anti‑Snore position if you use it. The bed should tilt the head slightly upward and the foot slightly down. No movement? That usually means the remote didn’t lock onto the base before the under‑bed LED stopped flashing.
Don’t forget to listen for the soft click you felt when you held the Pair button. If you missed it, repeat the hold for a few more seconds – the remote will keep sending the lock signal until the LED goes dark.
Common hiccups and how to fix them
Here’s a quick checklist you can run through before calling support:
- LED status – black remote: LED off; silver remote: LED stopped flashing.
- Battery health – fresh alkaline cells give a bright, steady flash.
- Interference – metal jewelry, watches, or a pet toy near the Pair button can block the signal.
- Distance – stay within a foot of the base when you press the first button; the remote’s antenna isn’t very powerful.
If any of those boxes stay unchecked, try these fixes:
- Swap the batteries with a fresh pair.
- Power‑off the base again, wait 60 seconds, then power back on.
- Press the Pair button on the remote for a full five seconds, even if the LED seems to stop early.
- Make sure the remote’s antenna strip on the back is facing upward and not covered by your hand.
Sometimes the issue isn’t the remote at all – a loose connection on the base’s computer module can cause intermittent signals. Give the module a gentle wiggle (don’t force it) and watch the LED. If it flickers, you may need to reseat the module or call a technician.
For a broader look at why adjustable beds occasionally misbehave, see this article on common adjustable bed issues. It covers things like motor calibration and wiring checks that apply to any brand, including Sophie.
Once the buttons respond reliably, you’ve officially turned your new remote into a trusted side‑kick. From here you can explore preset positions, massage cycles, or the gentle anti‑snore tilt without worrying about a dead‑end press.
And remember – never try to re‑pair an old remote. If you ever lose the original, simply order a fresh replacement from Sleep Sophie and repeat the steps above. A new remote means a clean slate and far fewer headaches.
Step 5: Save Settings and Maintain a Stable Connection
Alright, you’ve gotten that beep or click, the LED’s gone quiet, and the bed moves when you press a button. The next thing most people skip is actually locking in the settings so the remote doesn’t forget you tomorrow.
Why saving matters
Imagine you’re about to drift off after a long day, you hit “Head‑Up” and the bed lifts just right. A few minutes later the power flickers, the base restarts, and suddenly the remote acts like it’s brand new. That little reset can be frustrating for anyone with chronic pain – the extra bend and reach can be a real hurdle.
Saving the pairing information right after you finish the steps above tells the base to keep your remote’s ID in its memory. It’s the difference between “I’m ready” and “Did we just lose the connection?”
Confirm the pair was successful
Before you walk away, do a quick double‑check. Press the “Foot‑Down” button. The foot end should slide down smoothly. Then press “Head‑Up” again. If you still hear that loud beep (black remote) or feel the soft click (silver remote), you’ve got a solid link.
For extra peace of mind, look at the under‑bed LED one more time. It should stay dark. If it flickers, repeat the pairing steps – it usually means the base didn’t write the remote’s ID to its internal cache.
Lock in your preferred presets
Most Sophie beds let you store custom positions. After you’ve paired, move the bed into the exact angle that eases your back or helps your NDIS therapist’s plan. Then hold the “Memory” button (or the preset button you prefer) for about three seconds. You’ll see the LED flash briefly – that’s the bed saving the position.
Here’s a real‑world example: Sarah, a caregiver for her dad with limited mobility, always saves a “TV‑watch” preset right after pairing. That way, when her dad wakes up, she can press one button and he’s comfortable within seconds, no need to fiddle with multiple adjustments.
Keep the connection strong over time
Even a perfect pairing can degrade if the remote’s batteries run low. Fresh alkaline cells give a bright flash and a reliable signal. We’ve seen users who ignore the battery indicator end up with intermittent beeps that feel like the remote is “thinking”.
A quick habit: swap the batteries every six months, or whenever you notice the flash dimming. Keep the remote away from metal objects – a watch, a ring, or a pet’s collar can create interference right where the antenna sits.
Another tip that our service team swears by: after a power outage, give the base a minute before you try the remote again. That pause lets the base re‑initialize its radio module and recognize the saved ID without a hiccup.
Quick troubleshooting checklist
- LED under the bed stays dark after you press a button.
- Remote beeps (black) or clicks (silver) on the first press.
- Battery cells are fresh and properly seated.
- No metal objects near the remote’s antenna.
- Base has been on for at least 30 seconds after a power cycle.
If any of those boxes are unchecked, try swapping the batteries, power‑cycle the base again, or repeat the SW‑then‑Head‑Up (black) or Pair‑hold (silver) sequence.
Maintain a stable connection for the long haul
Once you’ve saved the settings, treat the remote like a key you’d keep on a hook – always within arm’s reach, never in a pocket full of coins. A stable environment reduces the chance of stray signals scrambling the pairing.
In our experience, customers who make a habit of checking the LED after a night’s sleep report fewer “remote lost” calls. It’s a tiny step that saves a lot of hassle, especially for elderly users who rely on the bed to get out of bed safely.
So, take a moment now to save that preset, swap the batteries if they look tired, and give the base a minute after any power change. You’ll end the day knowing your Sophie bed will be ready to lift, tilt, or massage exactly when you need it.
Additional Tips for Long-Term Use
Now that you’ve nailed the steps on how to pair adjustable bed remote, the real work begins: keeping that connection rock‑solid day after day. It’s easy to think “once it’s paired, that’s it,” but a remote is like a tiny battery‑powered sidekick – it needs a little love to stay reliable.
1. Treat the remote like a key, not a pocket‑saver
We’ve seen caregivers who toss the remote into a bag of coins, only to wake up to a dead‑beat beep. Keep the remote on a dedicated hook or a small tray right next to the bed. A consistent spot means the antenna isn’t constantly bumped by metal objects, and you’ll spot a dimming LED before it becomes a full‑blown failure.
And if you have kids or pets, a simple “no‑coins” rule saves you from stray interference. One of our users, Sam, put a tiny magnetic holder on the nightstand – now the remote never disappears, and he checks the LED each morning while sipping coffee.
2. Battery hygiene – swap before they quit
Alkaline cells are the gold standard for Sophie remotes. A fresh set gives you a bright, steady flash during the pairing dance and a loud beep when you press Head‑Up. When the flash starts to look faint, that’s your cue to replace the batteries. We recommend a six‑month schedule, or right after any power outage.
Pro tip: label the battery compartment with the replacement month. It feels a bit “cheesy,” but it cuts down on those “why isn’t it working?” moments.
3. Give the base a breath after power changes
After a blackout or when you unplug the base for cleaning, wait at least 30 seconds before reaching for the remote. The base’s radio module needs a moment to re‑initialize and remember the remote’s ID. Jumping in too fast can leave the LED flashing and the remote thinking it’s still in pairing mode.
Mark, an NDIS participant, always sets a kitchen timer for one minute after a power‑cycle. He says the extra pause “takes the guess‑work out of it” and the bed responds instantly.
4. Keep metal away from the antenna strip
The back of the remote has a thin metal strip that acts as the antenna. A watch, a ring, or even a metal‑rimmed glasses case can muffle the signal. Make it a habit to slide the remote onto a non‑metal surface before you press a button.
We’ve heard from elderly users who keep their watches on the opposite wrist when they’re about to adjust the bed. Small adjustments, big payoff.
5. Refresh the pairing memory every 12‑18 months
Even though you’re not supposed to re‑pair a working remote, a gentle “reset‑and‑re‑pair” after a year can clear any stray radio noise that accumulated over time. Just follow the original pairing steps – it takes under two minutes and guarantees the base’s memory is fresh.
Jane, a caregiver for her mother with chronic pain, does this during the annual mattress inspection. She reports fewer “remote lost” calls and smoother transitions between preset positions.
6. Leverage the memory presets for consistency
Once you’ve paired, spend a minute setting up your favourite positions – a “TV‑watch” tilt, a “reading” incline, or an “anti‑snore” angle. Hold the Memory button for three seconds; the LED will flash briefly, confirming the preset is saved. This way, even if the remote hiccups, you can press a single button and get back to comfort.
Imagine you’re half‑asleep and just want the head up – a saved preset does the work without you fiddling through menus.
7. Periodic visual checks keep surprises at bay
Make it a nightly habit to glance at the under‑bed LED after the bed powers up. If it’s dark, you’re good. If it’s still flashing, you’ve probably missed a step or a battery is low. A quick 10‑second glance saves a morning of troubleshooting.
These tiny habits add up. Think of them as a maintenance routine for a piece of tech that supports your health, comfort, and independence. By treating the remote with a little routine care, you’ll enjoy a hassle‑free experience for years to come.
Conclusion
We’ve walked through every flick of the LED, every press of the SW button, and the quick power‑cycle that gets a silver remote talking. By now you should feel confident that you can pair your new Sophie remote without a hitch – even if you’re juggling a night‑shift schedule or caring for someone with chronic pain.
Remember, the whole process hinges on three simple ideas: use a fresh remote, follow the exact timing for the flash sequence, and double‑check the under‑bed LED. If the light stays on, just repeat the step; a second try usually clears any stray signal.
So, what’s the next move? Take a moment right now to test the “Head‑Up” button one more time. Hear that beep? See the bed lift? Then lock in your favorite preset with the Memory button – you’ve just turned a piece of tech into a reliable bedside assistant.
In our experience, a quick visual check each morning saves dozens of support calls and keeps the remote humming for years. Keep fresh batteries handy, store the remote on a non‑metal hook, and give the base a minute after any power outage.
When you’ve mastered how to pair adjustable bed remote, you’ve reclaimed control over comfort, independence, and peace of mind. Need a refresher? The steps are always just a glance away in your user guide.
FAQ
Why should I only pair a new remote and never try to re‑pair the existing one?
Because the bed’s memory stores a single remote ID. When you try to re‑pair the same remote you’re essentially asking the base to forget its own record, which often leaves the LED flashing forever. In our experience, the safest route is to treat a lost or broken remote as a fresh start – swap in the replacement and run the full pairing sequence. That way the base writes a clean ID and you avoid a cascade of “remote lost” support calls.
What’s the exact step‑by‑step process to pair a black‑remote Sophie bed?
First, locate the hidden “Pair” button under the bed frame – you’ll see a quick white LED flash. Next, press and hold the SW (or Switch) button on the remote for about eight seconds until the whole remote starts flashing. Release the SW button immediately, then press and hold the Head‑Up button; you should hear a loud beep confirming the bed has heard you. Finally, glance under the bed: the white LED should have stopped flashing. If it’s still on, repeat the sequence once more.
How do I pair a silver‑remote Sophie bed when I’ve received a replacement?
Start by turning the base off – either unplug it or hit the power switch – and wait at least one minute. Power the base back on and watch for the under‑bed LED to begin flashing. Within five seconds of that flash, press and hold the Pair button on the top of the silver remote until the LED stops flashing. The soft click you feel in the remote signals a successful lock‑in. Once the light is steady, you’re good to go.
What should I do if the under‑bed LED keeps flashing after I think I’m done?
If the LED refuses to settle, it usually means the base never received the final handshake. First, double‑check the remote batteries – a weak cell can truncate the flash. Then power‑cycle the base again, wait a full minute, and repeat the appropriate pairing steps for your remote type. A quick visual check after each attempt helps you see whether the LED finally goes dark, confirming the remote ID is stored.
Do battery issues affect the pairing process and how can I avoid them?
Absolutely. Fresh alkaline cells produce a bright, steady flash that the bed reads without hiccups. When batteries are low, the remote may flash dimly or stop early, leaving the bed confused. We recommend swapping the batteries before you start pairing – even if the remote seems to work. Keep a spare pair of AA batteries on a nightstand and replace them every six months or after any power outage.
Can I test the connection right after pairing, and what’s the quickest way?
Yes, a quick test saves a lot of guesswork. After you see the LED go dark (black remote) or stop flashing (silver remote), simply press the Head‑Up button. You should hear the familiar beep and feel the head of the bed lift instantly. If the bed doesn’t move, repeat the pairing steps – most issues are resolved by a fresh battery or a brief pause before trying again.
Are there any common mistakes that prevent the remote from pairing correctly?
We see a few recurring slip‑ups: holding the SW button for too long or releasing it too early, pressing the Pair button after the five‑second window, and having metal objects (watch, ring, pet collar) near the remote’s antenna strip. Also, skipping the one‑minute power‑off for silver remotes is a frequent culprit. By keeping the remote level, clearing metal clutter, and timing the button presses as described, you’ll breeze through the pairing without a hitch.