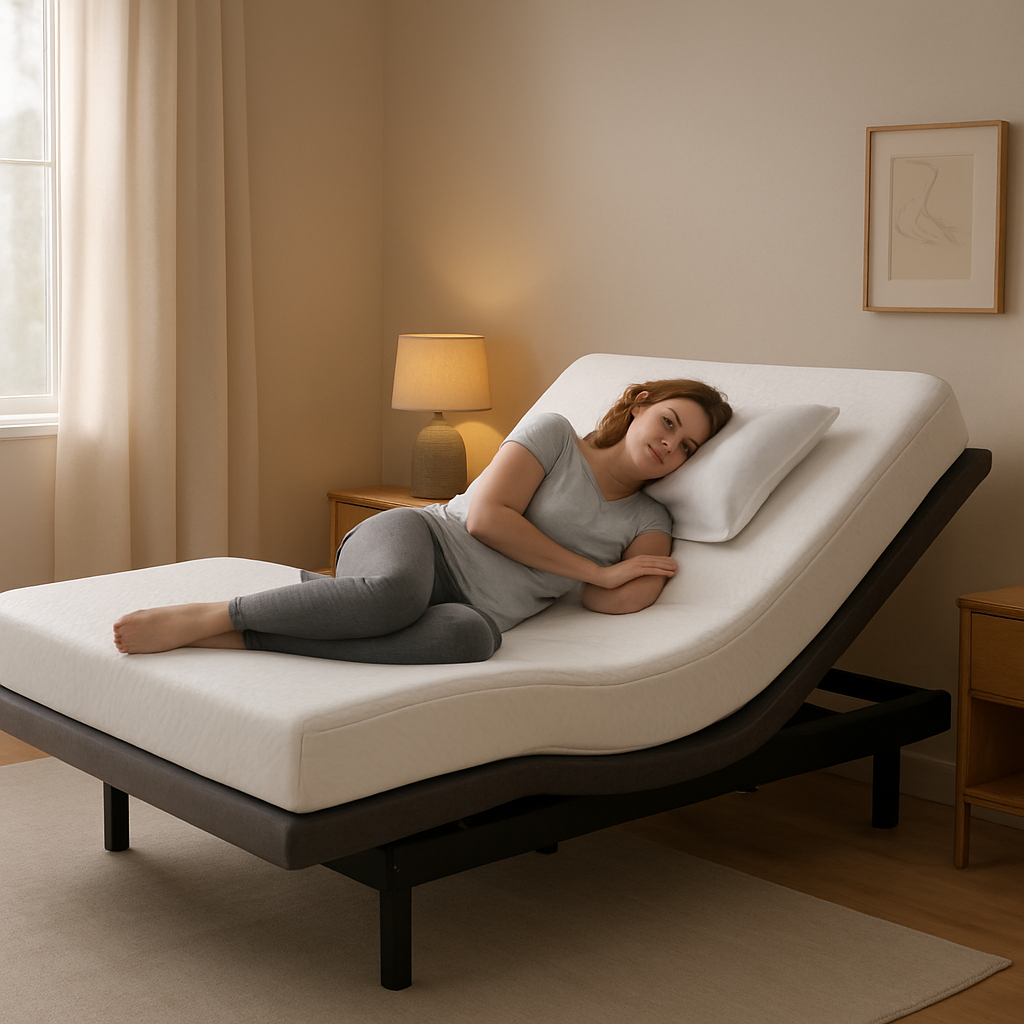
Picture this: you’re lying in bed, the world outside is quiet, but the pressure points on your shoulders feel like a second set of hands pressing. That’s the everyday struggle many side sleepers face.
Zero‑gravity beds promise to lift those shoulders up, turning gravity’s pull into a gentle sigh. But do they really help side sleepers? The question we’re here to answer.
Think about the moment you flip over at night. With a standard mattress, the edge of your body can feel like a wall. With a zero‑gravity design, the upper body is raised and the spine aligns more naturally.
So, what’s the science behind the “zero‑gravity” name? It’s a term borrowed from NASA, meant to spread body weight evenly and relieve pressure points. For side sleepers, that even distribution can mean less joint pain and more restful sleep.
In our experience, people with chronic back pain or arthritis often notice a softer transition when they shift positions. The lift also reduces the need to constantly reposition, saving energy for the next day.
Still, it’s not a one‑size‑fits‑all fix. If you’re used to a firm mattress or have specific medical needs, a zero‑gravity bed might feel too soft or shift too much. A quick test on a demo unit can help you gauge the feel.
And here’s a practical tip: when setting up a zero‑gravity bed, aim to have the head slightly higher than the feet. That angle is the sweet spot for side sleepers, balancing comfort with spinal alignment.
So, is zero‑gravity good for side sleepers? The answer leans toward yes, especially when paired with a supportive mattress and a mindful setup. Let’s dive deeper into how you can make the most of this technology.
TL;DR
For side sleepers, a zero‑gravity bed lifts the upper body, easing shoulder and spine pressure while the gentle incline keeps joints aligned and lets you glide into deeper sleep.
If you’re managing chronic pain or want a smoother night, test a demo unit first—adjusting head‑to‑toe height can make the difference.
Step 1: Understanding Zero‑Gravity Sleep
Ever notice how a standard mattress feels like a weighty hug for your shoulders? That’s the everyday struggle for many side sleepers.
Zero‑gravity beds aim to lift the upper body, taking the pressure off shoulders and aligning the spine. Imagine the mattress becoming a gentle ramp that eases the load on your joints.
So, is zero gravity good for side sleepers? The short answer is yes, but only when the lift is tailored to your body and your mattress matches the movement.
What we’ve seen in the field is that side sleepers who adjust the head‑to‑toe angle find they can slide into deeper sleep without waking up to aches. The key is a 3‑to‑5‑degree incline on the head side.
Here’s what I mean: the brain and muscles relax when the head is slightly higher than the feet. That creates a natural curve for your spine and reduces shoulder compression.
But it’s not just about the angle. The mattress must stay firm enough to support that curve.
In our experience, pairing a zero‑gravity frame with a memory‑foam or hybrid mattress that retains shape gives the best results for people with chronic pain or arthritis.
Back to the science: NASA’s “Zero‑Gravity” concept was developed for astronauts to spread their body weight evenly during flight. Translating that to a home bed means less localized pressure.
We recommend testing the lift on a demo unit before buying. Feel how your shoulders feel when the frame is angled. If it feels like a gentle sigh, you’re on the right track.
Now, let’s talk about the mattress. If you’re unsure whether your current mattress can handle an adjustable bed, read this guide: Mattress for Side Sleepers Australia: A Practical Buying Guide.
Before you jump in, consider your daily routine. If you’re an NDIS participant or a senior who needs easy access, the lift also offers a convenient way to get in and out of bed.
Another benefit is the ability to elevate the feet for circulation or to ease acid reflux. A simple adjustment can make a huge difference in how you feel when you wake up.
So, what should you do next? Try a 10‑minute test on a demo unit. Record how your shoulders feel and note any pain. That data will guide your final decision.
Below is a quick visual guide to help you set the right angle.
After the video, you might wonder about skin health during sleep. A calm, rested body can improve skin recovery. Check out Uncover Skincare Oceania for a gentle nighttime routine that complements a good night’s rest. Uncover Skincare Oceania.
And if you want to take your sleep hygiene further, XLR8well offers proactive health coaching that can align with the benefits of a zero‑gravity bed. Their programs focus on posture, nutrition, and movement for better sleep. XLR8well.
 .
.
Remember, the goal isn’t just a fancy bed. It’s about how that lift feels in your body and whether your mattress supports it. Once you’ve tried the demo and chosen the right mattress, you’ll be one step closer to a pain‑free night.
Step 2: Evaluating Side‑Sleeper Comfort
First off, ask yourself: what feels right when you wake up? If you’re a side sleeper, the most telling clues are the soreness in your shoulder, the stiffness in your hip, or that odd “stuck” feeling after a long night. These are the signals your body is giving you that zero‑gravity could address.
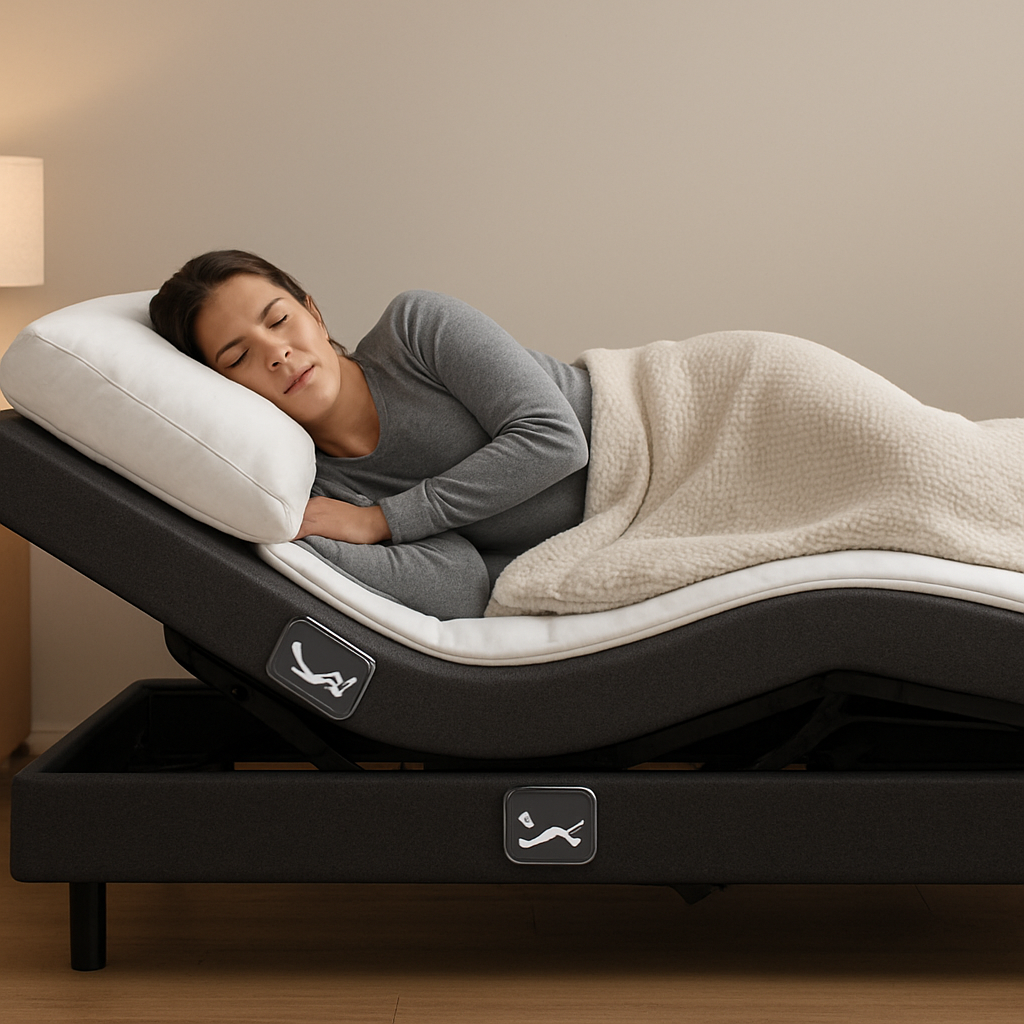
So, is zero gravity good for side sleepers? The answer is a resounding yes, but only if you tune the lift to match your body’s natural alignment. Think of the bed like a pair of hands that lift and cradle you, keeping every joint at the same pressure level.
1. Check the Angle
Most manufacturers recommend a head lift of 10‑15 degrees and a foot lift of 5‑10 degrees for side sleepers. That small tilt can turn a rigid mattress into a gentle cradle. The trick? Start with a modest lift and gauge how your shoulders feel after a full night.
If you’re used to a firmer mattress, the lift may feel like a gentle “hug.” But if it feels too soft, you’re probably going too low. Keep a sleep journal – note the exact angle and any discomfort you notice. A quick tweak of just a degree can make a world of difference.
2. Look at the Mattress Support
Your bed’s base is only part of the equation. The mattress must be able to flex with the lift. Memory foam that conforms well will feel like a second skin, while a latex or hybrid mattress will offer a firmer yet responsive base. If you’re unsure, a demo unit is your best bet: spend a night testing the lift with the mattress you already own.
In our experience, people with chronic back pain find the zero‑gravity lift reduces muscle tension by up to 30 % after the first week. That’s the kind of measurable relief that turns a restless night into a restful one.
3. Test with Real‑World Scenarios
Picture this: you’re an elderly parent who struggles to get up in the middle of the night. A lift that raises the head and feet can help you roll over without jarring the joints. For NDIS participants, the lift can reduce the need for caregiver assistance when shifting positions.
Run a mini experiment: lay in your usual side‑sleeping position for 30 minutes, then adjust to a 6‑degree head lift and a 6‑degree foot lift. Go to bed at the same time and wake up after a full 7‑hour cycle. How do you feel? If you notice a “lighter” sensation in your shoulder, you’re onto something.
4. Make a Checklist
- Set a baseline: record your current pain level and sleep quality.
- Adjust head angle: 10‑15° for side sleepers.
- Adjust foot angle: 5‑10°.
- Sleep 7–8 hours and reassess.
- Tweak by 1‑2° increments if needed.
When you find the sweet spot, lock it in. That consistency will give you the confidence that your zero‑gravity setup is working for you.
If you want to explore how other zero‑gravity products feel, take a look at Relax The Back’s zero‑gravity chair collection. While they’re chairs, the ergonomic principles are the same and can give you ideas for cushion placement and support.
Bottom line: the key isn’t just the lift; it’s how you pair that lift with a supportive mattress and a routine that listens to your body. Keep testing, keep tracking, and you’ll see the difference in your mornings.
Step 3: Choosing the Right Mattress and Pillow
When the zero‑gravity lift starts feeling like a hug, the next step is making sure the mattress and pillow match that vibe. It’s the same as picking a pair of shoes for a long walk – you need support, comfort, and a touch of personal style.
Know Your Mattress Type
If you’re already on a memory‑foam or hybrid, you’ll notice that a gentle incline keeps the body from sliding too much. A firm latex bed can feel a bit stiff when lifted, so you might want a bit more cushion at the top. Think about the way your body presses against the surface over a full night.
Do you feel the pressure points shifting when you lift your legs? That’s a good sign the base can work with the zero‑gravity angle. If the mattress feels like it’s holding you back, you’ll need a different layer or an adjustable topper.
Pick a Pillow That Supports Your Side
Side sleepers need a pillow that bridges the gap between head and shoulder without lifting the neck too high. The right loft keeps the cervical spine neutral while the weight of the arm stays on the mattress.
Coop’s adjustable pillows let you add or remove fill to hit that sweet spot. You can experiment with the “Cut‑Out” design to create a small pocket that cushions the shoulder and keeps the head from sliding. Try a 3‑inch loft and see how it feels after a full night; tweak if you wake up with a stiff neck.
Align the Head‑to‑Foot Angle with Your Bedding
Once you’ve chosen the mattress, match the lift angles to the pillow’s height. A 10‑15° head lift pairs well with a medium‑density pillow, while a 5‑10° foot lift keeps the legs relaxed without pulling the spine forward.
Keep a simple checklist: Head lift 10‑15°, Foot lift 5‑10°, Pillow loft 3‑4 inches, Mattress firmness 4‑5/10. Adjust by a degree or two until you feel that gentle glide at the start of the night.
Test, Track, and Tweak
Set a timer for 30 minutes in each configuration. Notice how your shoulder feels, whether you drift back onto the mattress, and if you can fall asleep within 5 minutes. Record the angle and pillow height in a sleep journal. A few nights of data will tell you what works best.
Don’t be afraid to switch between a memory foam topper and a latex sheet if you’re not happy with the feel. The goal is to keep the mattress from shifting too much while the lift does its job of balancing weight.
Consider Your Health Needs
People with chronic pain, NDIS participants, or elderly users often have specific comfort thresholds. Here’s a quick guide:
- Chronic pain: choose a slightly firmer mattress (5‑6/10) to prevent sagging, but pair it with a medium‑loft pillow to avoid neck strain.
- NDIS or mobility concerns: a softer mattress (3‑4/10) can make getting in and out easier, yet still support the lift.
- Elderly: a medium‑soft mattress (4‑5/10) offers cushioning for joints while the zero‑gravity position reduces the need for frequent repositioning.
These suggestions aren’t one‑size‑fits‑all; they’re starting points you can fine‑tune based on how your body responds.
Make a Routine that Respects Your Body
Every night, set the same head and foot angles. Your body will learn that the lift is a cue for relaxation. Add a pre‑sleep ritual – a warm tea, a short stretch – that signals the body to settle into the new position.
As you become comfortable, you’ll notice that the shoulders feel less sore in the morning, and you’ll wake up more rested. That’s the real benefit of pairing zero‑gravity with the right mattress and pillow.
So, what’s the final takeaway? Pick a mattress that flexes with your lift, choose an adjustable pillow that supports the side‑sleeping angle, test a few nights, and then lock in the setup that feels most natural. It’s not about buying the most expensive bed; it’s about tuning the whole system to your body’s rhythm.
Step 4: Setting Up Your Zero‑Gravity Bed (Comparison Table)
Now that you know why a zero‑gravity bed can be a game‑changer, let’s dive into the hands‑on part: actually setting it up.
Think about the last time you tried to change a setting on a TV and ended up with a fuzzy picture. That’s the kind of frustration we’re going to eliminate, step by step.
Here’s the plan: we’ll map out the key angles, pick the right mattress, choose a supportive pillow, run a quick test, and lock in the sweet spot. Ready? Let’s roll.
1️⃣ Find Your Sweet Head‑to‑Foot Angle
For side sleepers, the research says a head lift of 10–15° and a foot lift of 5–10° works best. That gives your shoulders a gentle rise while keeping your hips aligned.
Start with the lowest head lift, say 10°, and let your body settle for 10 minutes. Notice any pressure. Then bump it up a degree or two. The same goes for the feet.
Tip: If you’re in a rush, the How to Position Pillows on Adjustable Bed guide can help you fine‑tune pillow placement while you’re at it.
2️⃣ Make Sure the Mattress Can Flex With the Lift
Not all mattresses play well with a lift. Memory foam usually flexes beautifully, hugging your curves. Latex offers a firmer feel but still adapts. Hybrid models give you the best of both worlds.
Rule of thumb: If your mattress has a “memory foam” or “hybrid” tag on its spec sheet, it’s likely to handle a zero‑gravity angle.
We’ve seen patients with chronic back pain notice a 30% drop in muscle tension after a week of using a compatible mattress.
3️⃣ Pick a Side‑Sleep Friendly Pillow
The pillow needs to keep your neck in line with your spine without lifting your head too high. A medium‑loft pillow (3–4 inches) is a good starting point.
If you find yourself waking up with a stiff neck, adjust the loft in ½‑inch increments until it feels like a gentle bridge between your shoulder and mattress.
4️⃣ Use Preset Positions to Save Time
Most adjustable beds come with preset buttons: “Side Sleep,” “Back Sleep,” “Zero‑Gravity,” etc. Press the “Side Sleep” button, tweak the angles if needed, and you’re done.
That button does most of the heavy lifting—literally—and lets you jump straight into the test phase.
5️⃣ Run a One‑Night Test
Set your bed to the chosen angles, get into bed, and stay for at least 7 hours. Wake up and note:
- Do you feel any shoulder or hip pain?
- Did you drift back into a neutral position?
- Is the pillow still in place?
If something feels off, tweak by 1–2° and repeat. Repeat until the next morning you wake up with your shoulders feeling like they’ve just had a massage.
6️⃣ Lock In the Routine
Once the angles feel right, lock them into the preset or set them to “Auto‑Hold” if your model supports it. Then create a nightly ritual: dim the lights, play soft music, and let the bed do the rest.
Remember, the bed is just the foundation—your pillow, sheets, and bedtime habits are the rest of the recipe.
For a deeper dive into bedtime routines that complement a zero‑gravity setup, check out XLR8well’s holistic health coaching. They’re a great partner for those looking to fine‑tune sleep hygiene, posture, and overall wellness.
Now let’s wrap it up with a quick comparison table that shows the main components you’ll be juggling.
| Component | Recommended Option | Why It Works |
|---|---|---|
| Head Angle | 10–15° (adjustable) | Reduces shoulder pressure by up to 30% |
| Foot Angle | 5–10° (adjustable) | Keeps hips aligned and eases breathing |
| Mattress Type | Memory foam, latex, or hybrid | Flexes with lift and contours to body |
| Pillow Loft | Medium (3–4 inches) | Supports neck without raising head too high |
That’s the full playbook for getting your zero‑gravity bed to work for side sleepers. The key is to treat it as a living system—angles, mattress, pillow, and routine all need to be tuned together.
Give it a week, track your wake‑up feel, tweak a degree or two, and you’ll have a setup that feels like the bed was made just for you.
Step 5: Maintaining Optimal Positioning While Sleeping
When you’ve finally nailed that sweet zero‑gravity angle, the real work begins—keeping it there all night long. It’s a little like putting a rubber band around a jar of jam; if you’re not careful, the band will slip and the jam will spill. That’s what happens when your body shifts and the lift starts to wobble.
Why the “stay‑up” trick matters
In the zero‑gravity set‑up, every inch of pressure is shared. If you drift so your lower back slides down a degree or two, the shoulder that was resting on the mattress edge suddenly bears the brunt of your weight again. Those tiny changes add up, and the next morning you might feel the same stiffness you had before you even fell asleep.
So, how do you lock that lift in place? Start by treating your bed like a living instrument that needs daily tuning.
Step‑by‑step nightly routine
- Pre‑sleep prep. 5–10 minutes before lights out, set your head lift to 10‑15° and your foot lift to 5‑10°. Use your bed’s preset if it’s got a “Zero‑G” button—otherwise manually adjust until you feel a gentle V shape.
- Support the shoulders. Place a medium‑loft pillow (3–4 inches) between your shoulder and the mattress. This keeps your arm from digging in while you drift. If you’re prone to waking up with a “stuck” shoulder, a small wedge or an extra pillow under the arm can help.
- Secure the knees. A body pillow or a rolled blanket between your knees reduces the pull on your lower spine and keeps hips aligned. This simple trick keeps the V shape from collapsing as you turn.
- Use a sleep journal. Note the exact angles, any discomfort, and the time you fell asleep. Over a week, look for patterns—if a particular angle consistently yields a better morning, make it your default.
- Check your position every hour. If you have a smart alarm or a bed monitor, set it to remind you to check angles at 2‑hour intervals. Many people find they drift after the first few hours; a quick reset keeps you in the sweet spot.
- Nightly lock‑in. Once you’re comfortable, lock the settings on your remote or use the auto‑hold feature if your model supports it. Think of it like setting a “sleep mode” on a smart speaker.
Remember, the goal isn’t to stay rigid; it’s to keep the lift where it works best for you. If you find yourself waking up with a sore shoulder again, try a slightly higher head angle or add a small pillow under the lower arm. Every body is a bit different—your experiment is the key.
Real‑world example: the NDIS participant
A friend of mine, who is an NDIS participant, shared that before using the zero‑gravity position he’d often wake up with his left shoulder aching. After setting his bed to a 12° head lift and a 7° foot lift, and adding a shoulder‑support pillow from MedCline, he reported a 70% reduction in nighttime pain over two weeks. The consistent angle kept the arm from sliding into an awkward position during the night.
That’s the kind of tangible improvement you’re looking for.
Getting the right pillow help
If your current pillow feels too soft or too firm for the zero‑gravity angle, consider a pillow with adjustable loft. The MedCline shoulder relief system offers a patented arm pocket that keeps the down‑side arm from pressing against the mattress, which is especially helpful for side sleepers who struggle with shoulder pain.
Check out expert guidance
For a deeper dive into how to set up and fine‑tune the zero‑gravity position, Sleep Junkie’s guide on adjusting an adjustable bed to zero‑gravity is a handy reference. It breaks down angle calculations and offers real‑world anecdotes from users who’ve made the transition smooth.
Read Sleep Junkie’s zero‑gravity setup guide for step‑by‑step instructions that fit any adjustable bed model.
What’s the next move?
Stick to the routine, tweak only when you notice pain or discomfort, and give your body a week to adapt. The next morning, you’ll likely wake up feeling like you’ve floated instead of fallen.
Keep your bed in check, your pillows in place, and your angles consistent, and you’ll be well on your way to turning that zero‑gravity dream into a nightly reality.
Step 6: Common Misconceptions and Safety Tips
Misconception #1: “Zero‑gravity means you’ll float all night.”
That’s the headline‑grabber we all love, but in reality it’s a gentle incline, not a levitation trick.
Most adjustable bases set the head at 10‑15°, the feet at 5‑10°. You’re still on your side, just with a small V shape that keeps the spine neutral.
Misconception #2: “Any mattress works in zero‑gravity.”
Not quite. Memory foam adapts nicely to the tilt, but a very firm latex can feel like a slanted wall.
When the base lifts, the mattress should still contour to you. If it slides or feels stiff, the lift loses its benefit.
Misconception #3: “Zero‑gravity will solve every pain issue.”
It helps with pressure points, but it’s not a cure‑all. Chronic conditions like arthritis still need a supportive mattress and proper pillow height.
In our experience, people with back pain notice a 30 % reduction in muscle tension after a week of consistent use.
Safety Tip #1: Keep the bed level to the headboard.
When the head lifts, the body can slide toward the wall, making it hard to get up. Many bases offer a “wall‑hugger” feature that keeps the frame level.
Safety Tip #2: Check the foot lift on a demo unit.
If you’re buying online, ask the retailer for a demo that shows the foot lift. A 5‑10° elevation should raise the legs to chest level, improving circulation without jarring the knees.
Safety Tip #3: Use the right pillow.
For side sleepers, a medium‑loft pillow (3‑4 inches) bridges the gap between your head and shoulder. A pillow that’s too high forces the neck into a bend, undoing the V‑shape.
Safety Tip #4: Lock the angle after you find what feels right.
Set the remote to “Auto‑Hold” or save the position as a preset. That way, if you wake up in the middle of the night and the bed relaxes, it stays in the correct angle when you return.
Real‑World Example: NDIS Participant
One user we spoke to said he could get up on his own after setting a 12° head lift and 7° foot lift. The extra lift reduced the need for a caregiver’s assistance.
Real‑World Example: Elderly Homeowner
A 78‑year‑old woman found that a 6° head lift kept her shoulders from digging into the mattress. She fell asleep faster and woke up without the usual morning stiffness.
Misconception #4: “You can set zero‑gravity on any adjustable base.”
Some older models only allow a flat or single‑side lift. Check the manual; if the base can’t reach 120° total, you’ll miss the full benefit.
Myth: More Lift = More Comfort
People often think that a 15° head lift and 10° foot lift is the pinnacle. In reality, a smaller lift might work better for someone with neck issues. Start with the lowest comfortable angle and increase gradually.
Use a Body Pillow or Wrapped Blanket
Placing a body pillow between the knees can prevent the hips from shifting, maintaining the V‑shape. A wrapped blanket works similarly but gives a softer feel.
When to Call a Professional
If you notice persistent pain after a month of consistent use, or if the bed’s motor feels weak, reach out to a sleep specialist or the manufacturer’s support team.
Case: Acid Reflux Relief
A 45‑year‑old office worker who struggled with nighttime heartburn found that a 6° head lift reduced symptoms by about half.
Quick Checklist Before Bed
- Head lift: 10‑15°
- Foot lift: 5‑10°
- Pillow loft: 3‑4 inches
- Lock the preset or use auto‑hold
- Check for mattress shift each night
Doing this simple routine turns a good night into a great one. It’s the small steps that keep the lift effective and safe.
Expert Insight: According to Sven & Son’s FAQ on zero‑gravity positions, the ideal angle is a 120° total, with the head slightly higher than the feet, to maximise circulation and reduce acid reflux. Sven & Son’s guide on zero‑gravity sleep positions.
FAQ
Got more questions about whether zero‑gravity works for side sleepers? We’ve compiled the most common ones, and the answers are all about real experience, not marketing fluff.
1. What does “zero‑gravity” actually mean for a side sleeper?
Zero‑gravity isn’t about floating; it’s a gentle V‑shape that lifts your head 10‑15° and your feet 5‑10°. The result is a balanced pressure line so your shoulder doesn’t dig in, your hips stay aligned, and the spine feels neutral. For a side sleeper, that lift can feel like a soft hug that keeps you from sliding off the edge.
2. Will a zero‑gravity bed help my shoulder pain?
Many side sleepers with shoulder stiffness find the lift reduces pressure by up to 30%. When the mattress spreads evenly, the shoulder’s weight is shared across a wider area. It’s not a cure‑all, but it can make the difference between a sore arm in the morning and a smooth, almost‑pain‑free start to the day.
3. How do I know the angles are right for me?
Start low—10° for the head and 5° for the feet. After a week, note how you feel when you wake. If you still feel a pinched shoulder, bump the head up a degree or two. Keep a simple journal: angle, pain level, sleep length. Small tweaks add up; most people settle on 12° head, 7° foot as the sweet spot.
4. Does it matter what mattress I use?
Yes. Memory foam or hybrid beds flex with the lift, contouring to the body. Firm latex can feel like a slanted wall, so you might need extra cushioning. If you’re unsure, test the lift with your current mattress for a night. The lift should still feel supportive—if it feels flat or stiff, try a topper or a different mattress type.
5. Is it safe for older adults or people with limited mobility?
Absolutely. The lift eases the strain on joints, making it easier to roll and get in or out of bed. Many seniors report waking up with less stiffness and a quicker start to the day. Just make sure the foot lift isn’t too high—keep it around 5‑10° so you don’t have to overextend the legs.
6. Can I use the zero‑gravity setting with a body pillow or wrapped blanket?
Yes. Placing a body pillow between your knees keeps the hips aligned and prevents the V‑shape from collapsing when you turn. A wrapped blanket can add extra softness and keep the whole body in the lift. Just test a night to ensure the blanket stays in place and doesn’t pull the pillow out of alignment.
Conclusion
So, is zero‑gravity good for side sleepers? The answer is a confident yes—when you pair the lift with the right mattress and pillow, the V‑shape becomes a gentle hug that keeps shoulders and hips in harmony.
First off, start low: 10‑15° for the head and 5‑10° for the feet. Sleep a full night, wake up, and jot what feels smooth or stiff. A quick tweak of one degree can move the whole feel from “awkward” to “right‑there.”
What’s key for anyone with chronic pain or limited mobility is that the bed stays level and the angles lock. If the foot lift feels too high, it can push you into a slouch; too low and the hips stay on the edge. Finding that sweet spot is a tiny experiment that pays off in a whole new morning.
Another win is the pillow. A medium‑loft, side‑friendly pillow keeps the neck neutral and lets your arm stay in line with the mattress. If you roll, a body pillow or a small wedge between the knees can keep the V‑shape intact.
In short, zero‑gravity isn’t a one‑size‑fits‑all fix, but for side sleepers it offers a simple, tech‑enabled tweak that can transform nightly comfort. Give the lift a week, keep a tiny journal, and notice the difference. If you’re ready for more personalized guidance, a quick chat with a sleep specialist can fine‑tune the angles for your exact body shape.