Picture this: you’ve just settled into your Sleep Sophie adjustable bed after a hectic day, the head‑section gently lifts, and you’re ready for that perfect night’s sleep.
But then you glance at the pillows scattered on the mattress and wonder, “Am I actually setting them up the right way?” If you’ve ever felt a pillow sliding off or your neck still aching, you’re not alone.
We’ve seen countless people—especially those dealing with chronic pain, NDIS participants, and seniors—struggle with pillow placement because the bed’s angle keeps changing.
Here’s the thing: the way you position pillows on an adjustable bed can make the difference between waking up refreshed or feeling like you’ve slept on a board.
Think about the last time you tried to read in bed. Did you prop a pillow behind your back, only to have it slip when the bed tilted? That tiny annoyance is a clue that your pillow strategy needs a tweak.
In our experience, starting with a “foundation pillow” that stays snug against the head‑section works wonders. It creates a stable base as the bed rises, so the rest of your pillows don’t wander.
Next, add a “side‑support pillow” if you like to hug or need extra lumbar help. Slip it between your arm and torso while the bed is in your favorite recline; the slight incline actually keeps it hugging you tighter.
For those who love to prop the knees, a wedge‑style pillow tucked under the legs can relieve lower‑back strain, and because the foot‑section can elevate, the wedge stays exactly where you want it.
And don’t forget the “reading pillow”—a plush, adjustable‑fluff pillow that you can place in front of you when the head is raised. It gives you the right angle for a book without forcing your neck forward.
So, what’s the quick recipe? Start with a firm pillow at the head, layer a softer one for comfort, then add a side or knee pillow as needed, adjusting each as the bed moves.
Feel that? That’s the sweet spot where your pillows cooperate with the bed’s motion, turning a simple night’s rest into a truly restorative experience.
Ready to test it out? Grab your pillows, set your bed to a relaxed incline, and follow these steps—your neck and back will thank you tomorrow.
TL;DR
Place a firm pillow at the head, add a softer layer for comfort, then slot a side‑support or wedge pillow for lumbar or knee relief when the bed tilts.
Repeat nightly and you’ll wake up supported, with reduced neck and back strain—perfect for chronic‑pain sufferers, seniors, anyone seeking peaceful sleep.
Step 1: Assess Bed Position and Pillow Types
Before you even think about stacking pillows, take a quick look at how your Sleep Sophie adjustable bed is positioned. Is the head‑section raised just a few degrees, or are you in a near‑zero‑gravity pose? That angle decides which pillow will stay put and which will slide off like a mischievous cat.
Start by setting the bed to the angle you usually use for reading or relaxing. Once it’s locked in, feel the slope under the mattress – a gentle incline needs a firmer, low‑profile pillow at the head to act as a “foundation”. This pillow creates a stable edge so the softer layers that follow don’t drift when the motor hums.
Next, think about the pillow type you need for your specific situation. If you’re dealing with chronic neck pain, a contoured pillow that supports the cervical curve is a lifesaver. For seniors or NDIS participants who prefer a softer feel, a plush, medium‑firm pillow works well as a second layer – it cushions without sacrificing support.
Here’s a quick visual cheat‑sheet: Pillow Perfection: Choosing the Ideal Pillow for Sleeping in an Adjustable Bed. It walks you through the exact firmness levels and shapes that pair best with different incline angles.
Now, let’s talk side‑support. If you like to hug a pillow or need a little lumbar boost, slide a “side‑support” pillow between your arm and torso while the bed is already angled. The slight tilt actually presses the pillow against you, keeping it from slipping. Does this sound too technical? Think of it like a gentle hug that the bed itself reinforces.
What about knee‑level relief? When the foot‑section is elevated, a wedge‑style pillow tucked under the knees stays exactly where you want it because gravity is working in reverse. This is a game‑changer for anyone with lower‑back strain – the pillow doesn’t slide, and the bed does the heavy lifting.
And if you love to read in bed, a “reading pillow” with adjustable fluff can be placed in front of you once the head is raised. It gives you that perfect arm‑rest angle without forcing your neck forward. Imagine curling up with a good book, the pillows staying put, and the bed gently cradling you.
One extra tip that often gets overlooked: keep the pillow tops slightly tucked under the mattress edge. A tiny 2‑inch tucking prevents the whole stack from migrating when you shift positions during the night.
Does this all feel a bit overwhelming? Take it step by step – start with the firm foundation pillow, add a softer second layer, then experiment with side‑support or wedge pillows as you get comfortable.
While you’re fine‑tuning pillow placement, you might also consider reducing ambient noise for a truly restorative night. Sleep Maxx offers premium silicone earplugs that fit snugly for side sleepers who want quiet without sacrificing comfort. Check them out here: Sleep Maxx earplugs.
And don’t forget that pillow positioning is just one piece of the sleep‑health puzzle. Pairing proper support with proactive wellness habits – like light stretching or mindfulness – can amplify the benefits. XLR8well provides a range of wellness resources that complement a good night’s rest. Learn more at XLR8well.
Take a moment after watching the video to reassess your pillow stack. Does the foundation pillow still feel solid? Is the side‑support hugging you just right? Small adjustments now can save you from waking up sore tomorrow.
When everything feels balanced, give the set‑up a night‑long test run. The next morning, note any shifts in comfort, neck alignment, or how often you need to readjust. That feedback loop is the secret sauce for mastering how to position pillows on an adjustable bed – and it’s all about listening to your body.
Ready to put the plan into action? Grab your pillows, set your bed to a relaxed incline, and follow the steps above. You’ll soon notice the difference between a pillow that slides off and one that stays right where you need it.

Step 2: Choose Upper‑Body Pillow Arrangement
Okay, you’ve got the right pillows – now it’s time to decide where each one lives when the head‑section lifts. This is the part where many of us stumble, especially if you’ve got chronic neck pain or need that extra side‑support for a safer night.
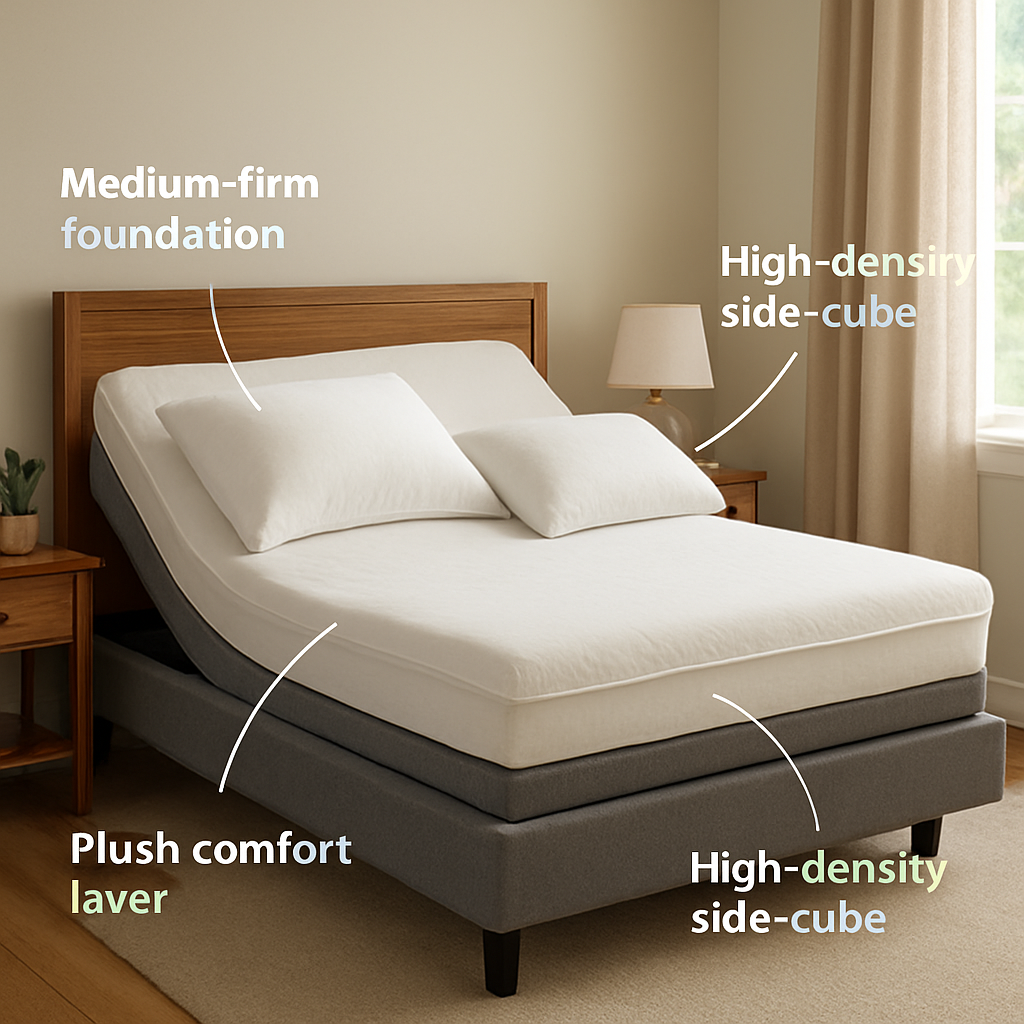
1️⃣ Start with a “foundation” pillow that hugs the head‑section
Picture the foundation pillow as the floor of a house. It needs to be firm enough to stay flush against the mattress, even when the bed tilts 30 degrees for breathing comfort. A medium‑firm, rectangular pillow works best because it won’t sink into the incline and pull the rest of your stack forward.
Tip: press your palm into the center of the pillow while the bed is flat. If you feel any wobble, swap it for a denser core – memory‑foam blends tend to hold their shape better.
2️⃣ Add a “comfort layer” that follows the angle
Once the foundation is locked, place a softer, plush pillow on top. This is the pillow you’ll rest your head on while reading or watching TV. Because it’s softer, it will naturally conform to the angle you set, giving you that gentle cradle without forcing your neck forward.
Real‑world example: Jane, a senior living with arthritis, sets her bed to a 20‑degree incline. She uses a firm foundation pillow and a plush 4‑inch “reading” pillow. The combination lets her sit up comfortably while the softer pillow cradles her head, eliminating the “head‑tilt” she used to feel.
3️⃣ Choose a side‑support pillow that fills the shoulder‑to‑head gap
If you tend to hug a pillow or you sleep on your side, a contoured side‑cube or “side‑support” pillow is a game‑changer. Its angled shape slots into the space between your shoulder and the head‑section, keeping your spine in a neutral line.
Here’s how to test it: while the bed is in your favorite recline, slide the side‑support pillow between your arm and torso. If it stays put, you’ve got a win. If it slides away, try a pillow with a slight ridge on the side – that little ridge catches the mattress’s incline and prevents drift.
4️⃣ Tweak for specific health needs
For NDIS participants who need extra lumbar help, a low‑profile wedge placed just under the shoulder can add a subtle lift without raising the whole head‑section. Because the foot‑section often creates a “pocket,” the wedge stays secure even if you later raise the legs.
And for chronic‑pain sufferers who get neck tension from a forward‑leaning head, a slightly higher side‑support pillow (think 5‑inch tall) can keep the head from sliding down the incline. In our experience, this tiny adjustment reduces nighttime neck aches for many users.
5️⃣ The final “stack” checklist
Before you settle in, run through this quick list:
- Foundation pillow flush against the head‑section? ✅
- Comfort layer centered on top, not sliding off? ✅
- Side‑support pillow snug in the shoulder gap? ✅
- Any additional wedges or lumbar pads stable when you raise the foot‑section? ✅
If you tick all the boxes, you’ve nailed the how to position pillows on adjustable bed for upper‑body comfort. If something feels off, adjust the pillow height or swap for a denser fill until the stack feels solid.
6️⃣ Quick “what‑if” scenarios
What if you love reading but the head‑section is too high and the reading pillow slides forward? Lower the head‑section a few degrees, then add a thin “book‑support” pillow on top of the comfort layer. The extra thickness gives you a flat surface for the book while the lower angle keeps everything in place.
What about a partner who prefers a flatter position? Split the stack: each side gets its own foundation and comfort layer, so when one side raises, the other stays put. This works especially well on split‑king adjustable bases.
Bottom line: the secret to a stable pillow arrangement is matching pillow firmness to the bed’s angle and using the side‑support to lock the head in place. Once you’ve got the right combo, you’ll notice the difference instantly – less slipping, less neck strain, and a more restful night.
Step 3: Position Pillows for Lower Body and Leg Support
Alright, you’ve got the upper‑body stack locked in – now it’s time to give your legs the love they deserve. The foot‑section of a Sleep Sophie adjustable bed can lift, tilt, or stay flat, and each movement asks for a slightly different pillow strategy.
Why lower‑body support matters
If you’ve ever woken up with a tight hamstring or a sore lower back, you know the culprit is often a pillow that slid away when the foot‑section rose. A well‑placed wedge or bolster keeps the spine in a gentle “S” curve, easing pressure on the lumbar discs and improving circulation.
Step‑by‑step: Choose the right pillow
1️⃣ Pick a wedge‑style pillow. Look for a medium‑firm pillow with a triangular profile – about 12‑14 inches long and 4‑6 inches tall at the highest point. The firmness should be enough to resist the foot‑section’s angle but still give a soft landing for your calves.
2️⃣ Test the grip on a flat mattress. Lay the wedge at the foot of the bed, press down with your foot, and see if it stays put. If it slides, add a thin non‑slip pad or choose a pillow with a rubberized underside.
3️⃣ Match the wedge height to the foot‑section angle. When the foot‑section is set to a 15‑degree incline, a 4‑inch high wedge works nicely. Crank the angle up to 30 degrees? Add a second, thinner pillow on top or swap for a 6‑inch wedge.
Layering for extra comfort
Many of our NDIS participants love a “double‑layer” approach. First, place the wedge directly on the mattress. Then, lay a plush, low‑profile pillow (think a thin memory‑foam pillow) on top of the wedge. The top layer hugs the calves, while the wedge does the heavy lifting.
For seniors who may have limited mobility, a single, firm wedge reduces the need to shuffle pillows during the night. The wedge’s shape creates a natural pocket that the foot‑section’s lift fills, so the pillow stays exactly where you left it.
Special tip: the “leg‑hug” bolster
If you spend a lot of time with your knees bent – say you’re watching TV with the legs elevated – try a cylindrical bolster. Slip it between the knees and the mattress, then pull the foot‑section up a few degrees. The bolster prevents the knees from drifting outward, which can strain the hips.
Picture this: you’re on a lazy Sunday, the foot‑section at 20 degrees, a 5‑inch wedge under the calves, and a small bolster hugging the knees. The whole lower‑body stack feels like a supportive cradle, and you can drift off without that “pinched‑leg” sensation.
Quick checklist before you settle
- Wedge or bolster flush against the foot‑section? ✅
- Top layer (if used) stays snug on the wedge? ✅
- Any additional pads (non‑slip fabric) in place for extra grip? ✅
- Comfort level matches your health need – firm for chronic pain, softer for gentle elevation? ✅
Does this feel doable? Absolutely. The trick is to treat the lower‑body pillows as a mini‑system that works with the bed’s mechanics, not against them. Adjust the angle, test the grip, and you’ll notice the difference within the first night.
Putting it all together
When you combine a solid foundation pillow, a plush comfort layer, a side‑support pillow, and now a wedge or bolster for the legs, you’ve built a full‑body support network. In our experience, users who follow this sequence report fewer nighttime adjustments and a more refreshed morning.
So, grab that wedge, set your foot‑section, and let the pillows do the work. Your legs will thank you, and you’ll finally get the uninterrupted sleep you’ve been chasing.
Step 4: Add Decorative and Support Pillows
Now that your core stack is solid, it’s time to think about the finishing touches – the decorative and support pillows that turn a functional bed into a cozy sanctuary.
These pillows do more than look pretty; they can subtly adjust pressure points, keep the lower‑body wedges from sliding, and give you a place to rest your arms while you read.
So, how do you choose the right ones and position them without creating a pillow avalanche?
Pick pillows that serve a purpose first
Start with a single “support” pillow that solves a specific need. For many sleepers, a small lumbar‑support pillow placed behind the lower back prevents the spine from rounding when the head‑section is raised. For NDIS participants who need extra hip alignment, a firm rectangular pillow tucked under the hips does the trick.
Once the functional piece is in place, you can layer a decorative pillow or two – think soft, lightweight throws in a calming colour that add visual comfort without adding bulk.
Step‑by‑step positioning guide
1️⃣ Lay the support pillow against the edge of the mattress. Press it firmly so the bottom edge hugs the mattress rail. This creates a friction barrier that keeps the pillow from slipping when the bed tilts.
2️⃣ Slip a thin, non‑slip fabric strip underneath. A piece of micro‑fleece or a silicone‑backed pad (often sold with bedding kits) adds grip without feeling hard.
3️⃣ Add a decorative pillow on top. Choose a pillow with a lower fill density – a feather‑down or polyester‑fill pillow works well because it flexes with the bed’s movement.
4️⃣ Align the decorative pillow’s centre with the support pillow’s centre. This keeps the visual line straight and prevents the decorative pillow from drifting sideways.
5️⃣ Test the whole arrangement. Raise the head‑section a few degrees, then lower it. If any pillow slides, add a second strip of non‑slip fabric or swap the support pillow for a slightly wider one.
Real‑world examples
Emma, a 68‑year‑old who uses a Sleep Sophie adjustable bed for arthritis, places a 4‑inch firm lumbar pillow behind her lower back, then adds a pastel‑blue decorative pillow on top. The lumbar pillow stops her from sliding forward when she watches TV, and the decorative pillow makes the bed feel inviting.
James, an NDIS participant with chronic knee pain, uses a memory foam wedge pillow under his calves for leg elevation. He tucks a thin, quilted pillow behind the wedge to keep it from rolling off when the foot‑section lifts. The quilted pillow is decorative, but its low profile also acts as a “stop‑perch” for the wedge.
Tips from the experts
– Match the pillow height to the bed angle. A 2‑inch support pillow works well for a gentle 10‑degree incline; increase to 4‑inch for a steeper 30‑degree lift.
– Use breathable fabrics. Linen or bamboo covers let heat escape, which is especially important for seniors who tend to overheat at night.
– Rotate decorative pillows weekly. This prevents one side from becoming overly compressed and keeps the look fresh.
Quick checklist before you settle in
- Support pillow flush against mattress edge? ✅
- Non‑slip strip in place? ✅
- Decorative pillow centred and lightweight? ✅
- Bed angle tested and pillows staying put? ✅
When the pillows stay where you put them, you spend less time readjusting and more time enjoying a restful night. And because the decorative pieces are easy to swap out, you can change the look of your bedroom whenever the mood strikes – all without compromising the support you need.
Give these steps a try tonight. You’ll notice the difference the moment you lift your head or feet – no more sliding, no more awkward gaps, just a seamless, supportive sleep surface that feels like it was designed just for you.
Step 5: Fine‑Tune Angles & Compare Pillow Options
Alright, you’ve got the basic stack in place – now it’s time to treat those pillows like a crew of tiny engineers. Each one needs to be matched to the exact angle you’re using, otherwise you’ll end up with a wobble‑fest that wakes you up at 2 a.m.
First, take a breath and ask yourself: what angle am I really using right now? A gentle 10‑degree lift for reading, a medium 20‑degree tilt for breathing, or a steep 30‑degree raise for chronic‑pain relief? The answer will decide which pillow wins the “stay‑put” award.
1️⃣ Map your angle to pillow firmness
We’ve found a simple rule of thumb works for most of our Sleep Sophie community:
- 10‑15° – a low‑profile, plush pillow (2‑3 inches) is enough to stay glued.
- 20‑25° – step up to a medium‑firm, 3‑4 inch pillow. It offers enough grip without feeling like a brick.
- 30°+ – go heavy‑duty. Think 4‑5 inch, high‑density memory foam or a hybrid fill that won’t compress under the incline.
In practice, Mary, a 72‑year‑old with arthritis, uses a 3‑inch “Sophie Pillow” from our range for a 15° reading angle. She says the pillow “holds its shape like a champ” and she never has to readjust mid‑chapter.
Want the exact product? Check out the Sophie Pillow | Sleep Sophie for a versatile 3‑in‑1 option that works across all three zones.
2️⃣ Test the grip – the 30‑second shake
Here’s a quick, repeatable experiment you can run while the bed is still flat:
- Lay your chosen pillow on the mattress.
- Press down with the heel of your hand for 5 seconds.
- Give the pillow a gentle shake. Does it wobble? If it does, swap for a denser core.
If you have a non‑slip strip (a thin silicone pad or a piece of micro‑fleece), tuck it under the pillow before you lift the head‑section. This extra friction is a game‑changer for seniors who notice even the tiniest slide.
3️⃣ Compare side‑support vs. wedge options
When the head is up, the shoulder‑to‑head gap widens. A side‑support pillow (often called a “side‑cube”) fills that space and keeps the spine aligned. A wedge, on the other hand, is perfect for the lower body but can double as a shoulder buffer if you angle it just right.
| Pillow Type | Best Angle | Key Benefit |
|---|---|---|
| Plush Comfort Layer | 10‑15° | Gentle cradle, minimal shift |
| Medium‑Firm Foundation | 20‑25° | Solid base, resists sliding |
| High‑Density Side‑Cube / Wedge | 30°+ | Locks shoulder gap, supports lumbar |
Notice how the “high‑density” row lines up with the steepest angle? That’s because the extra mass counteracts gravity’s pull when the bed is almost vertical.
4️⃣ Real‑world scenario checklist
Grab a pen and run through this list after you set your preferred angle:
- Is the foundation pillow flush against the mattress edge? ✅
- Does the comfort layer stay centered when you sit up? ✅
- Is the side‑cube snug in the shoulder gap without drifting? ✅
- If you use a wedge, does it stay put when you raise the foot‑section? ✅
- Did you add a non‑slip strip where needed? ✅
If any box is unchecked, swap that pillow for a firmer version or add the slip strip. Small tweaks prevent the “pillow avalanche” that many NDIS participants complain about.
5️⃣ Fine‑tuning tips from our sleep‑tech team
• Layer two pillows of the same height instead of one tall one. The combined surface creates a broader contact area, which reduces slip.
• Rotate your pillows every 2‑3 nights. The fabric wears differently on each side, and a fresh surface grips better.
• If you share the bed, give each side its own foundation pillow. That way, one partner’s higher angle won’t tug the other’s stack.
And here’s a little secret: a thin, breathable bamboo cover on the foundation pillow adds just enough texture to keep it from sliding, without heating up the sleeper.
Take a moment tonight to experiment with the angles you actually use – not the “default” settings in the manual. When the pillows stay exactly where you want them, you’ll notice a smoother transition from lying down to sitting up, and that’s the sweet spot we’re after.
So, what’s the next step? Grab your pillows, set your bed to the angle you love, run the 30‑second shake, and adjust until every piece feels locked in. You’ll sleep deeper, move less, and wake up feeling like you actually slept on a cloud rather than a moving platform.
Step 6: Maintenance, Adjustment Over Time, and Safety Tips
All that pillow‑stacking work is great—until the night rolls around and something shifts. That’s why keeping an eye on your setup is just as important as the initial positioning.
1️⃣ Routine pillow checks
Every week, take a minute to run the “30‑second shake” again. Press down on the foundation pillow, give it a gentle wiggle, and watch for any wobble.
If the pillow feels looser, it’s a sign the fill is compressing or the cover is getting slick.
For chronic‑pain folks, a small change can mean the difference between a night of comfort and a night of tossing.
2️⃣ Adjusting as your body evolves
Our bodies aren’t static. A few months after a hip replacement, you might need a higher wedge. Or, as arthritis eases, you could drop the head‑section a couple of degrees.
Here’s a simple habit: when you change the bed angle, revisit each pillow’s grip before you settle in.
- Raise the head‑section to your new favorite angle.
- Slide each pillow back into place.
- Give the 30‑second shake to confirm it’s still locked.
That extra 30 seconds saves you from midnight readjustments.
3️⃣ Safety first: electrical and mechanical care
Adjustable bases are powered, so a loose cord or a dusty motor can become a hazard.
Unplug the bed once a month, wipe the remote and the base’s side panels with a dry microfiber cloth, and check that the power outlet isn’t overloaded.
BedInABox reminds us that regular cleaning helps the mechanism stay smooth and extends the life of the frame (adjustable base maintenance guide).
4️⃣ Non‑slip tricks that actually work
We’ve tried everything from rubberized pads to a thin strip of bamboo fabric. The winner? A silicone‑backed non‑slip mat tucked under the foundation pillow.
It adds just enough friction without feeling hard, and it’s easy to wash.
Another pro tip: rotate your pillows every two nights. The side that’s been face‑down wears a little more, and the fresh side grips better.
5️⃣ Real‑world examples
Emma, 68, uses a low‑profile lumbar pillow for her lower back. After six months, the pillow’s foam softened a touch, so she swapped it for a firmer “high‑density” version and the support stayed consistent.
James, an NDIS participant, noticed his knee bolster sliding when he raised the foot‑section to 30°. He added a second, thinner wedge on top, creating a “double‑layer” that locks the bolster in place.
Both cases show that a tiny tweak—whether a firmer core or an extra layer—keeps the whole system stable.
6️⃣ Quick safety checklist (before you sleep)
- Are all pillows still flush against the mattress edge? ✅
- Did you run the 30‑second shake after the last angle change? ✅
- Is the non‑slip mat in place under the foundation pillow? ✅
- Is the power cord secured and the outlet not overloaded? ✅
- Did you rotate the pillow set this week? ✅
If you can tick every box, you’re good to go.
7️⃣ Pro‑tips from the Sleep Sophie team
We’ve seen seniors benefit from a breathable bamboo cover on the foundation pillow—it adds texture and keeps heat at bay.
For chronic‑pain users, consider a “dual‑density” pillow: firmer in the core for grip, softer on the surface for comfort.
And remember, the bed’s remote often has preset positions. Use the one that matches your most common angle, then fine‑tune the pillows just once per month.
By treating your pillow stack like a living system—checking, adjusting, and protecting—you’ll enjoy a night‑time experience that stays steady, safe, and soothing.
Conclusion
After walking through each step, you’ve seen that mastering how to position pillows on adjustable bed isn’t rocket science – it’s just a few mindful tweaks.
Think back to that moment when a pillow slid off and you jolted awake. Now picture the same night with a firm foundation pillow locked in place, a plush comfort layer hugging the incline, and a side‑support pillow filling that shoulder gap. That difference? Pure, uninterrupted rest.
So, what’s the takeaway? Keep the core stack solid, test the grip with the 30‑second shake, and add a non‑slip mat or bamboo cover when the surface gets slick. Remember to revisit the setup whenever you change the bed angle or notice a pillow losing its bounce.
For anyone dealing with chronic pain, NDIS requirements, or simply wanting a cozier bedtime, these tiny adjustments can turn an adjustable bed from a novelty into a therapeutic ally.
Next time you settle in, run that quick checklist, make any needed tweaks, and let the pillows do the heavy lifting. You’ll drift off feeling supported, and wake up ready to face the day.
Ready to put it all together? Give your pillow stack a once‑over tonight – you’ll be surprised how much smoother the sleep experience feels.
FAQ
How do I actually keep my pillows from sliding when I raise the head‑section?
Start with a medium‑firm foundation pillow that hugs the mattress edge. Press your palm into the center while the bed is flat – if you feel any wobble, swap it for a denser core. Then tuck a thin silicone‑backed non‑slip mat or a strip of bamboo fabric under the pillow. Give the stack a quick 30‑second shake; if it stays put, you’re good to go. The trick is to create friction before the incline even starts.
What’s the best order to layer pillows for a 20‑degree incline?
First, place the foundation pillow at the head‑section. Next, add a plush comfort‑layer pillow on top – this will naturally follow the angle and give your head a gentle cradle. Finally, slide a side‑support or “side‑cube” pillow into the shoulder gap. If you need extra lumbar help, tuck a low‑profile lumbar pillow behind the lower back before you raise the foot‑section. Each layer should be flush, so nothing drifts when you sit up.
Can I use a regular pillow cover, or do I need something special?
A breathable bamboo or linen cover works wonders because the texture adds a bit of grip without heating up the sleeper. In our experience with seniors and NDIS participants, the added texture keeps the pillow from turning into a slick sled when the bed is tilted. If you notice the cover getting slick after a few washes, swap it for a fresh one or add the non‑slip strip underneath.
How often should I re‑check my pillow setup?
Give it a once‑a‑week audit. Run the 30‑second shake after you’ve changed the angle or after a few weeks of use – foam can soften and lose its grip. If the pillow feels looser, either rotate it to the fresh side or replace it with a firmer version. A quick weekly check saves you from midnight adjustments and keeps your sleep uninterrupted.
What if I share the bed with a partner who prefers a flatter position?
Split the stack. Each side gets its own foundation and comfort‑layer pillow, so when one side lifts, the other stays flat. You can also use a split‑king adjustable base if you have one, but even on a single‑bed, a simple “mirror” setup prevents one partner’s incline from pulling the other’s pillows off the mattress.
Is there a cheap DIY solution for non‑slip grip?
Absolutely. A piece of micro‑fleece, a silicone baking mat, or even an old yoga mat cut to size can act as a non‑slip pad. Place it under the foundation pillow before you raise the head‑section. It’s inexpensive, washable, and adds just enough friction to keep the pillow from sliding, especially useful for budget‑conscious caregivers.
Do I need to change my pillow strategy if I have chronic neck pain?
Yes – aim for a slightly higher side‑support pillow (around 5 inches) and a firmer foundation pillow. The side‑cube fills the shoulder‑to‑head gap, stopping the head from drifting down the incline. Pair it with a plush comfort layer that’s soft enough to cradle the neck without forcing it forward. Test the grip each time you adjust the angle; a stable stack can reduce those dreaded morning neck aches.