Ever rolled onto your side and felt like the mattress was a hard slab, while your partner on their back complained about sinking too far? That’s the classic nightmare for side sleepers sharing an adjustable bed, and it’s more common than you think.
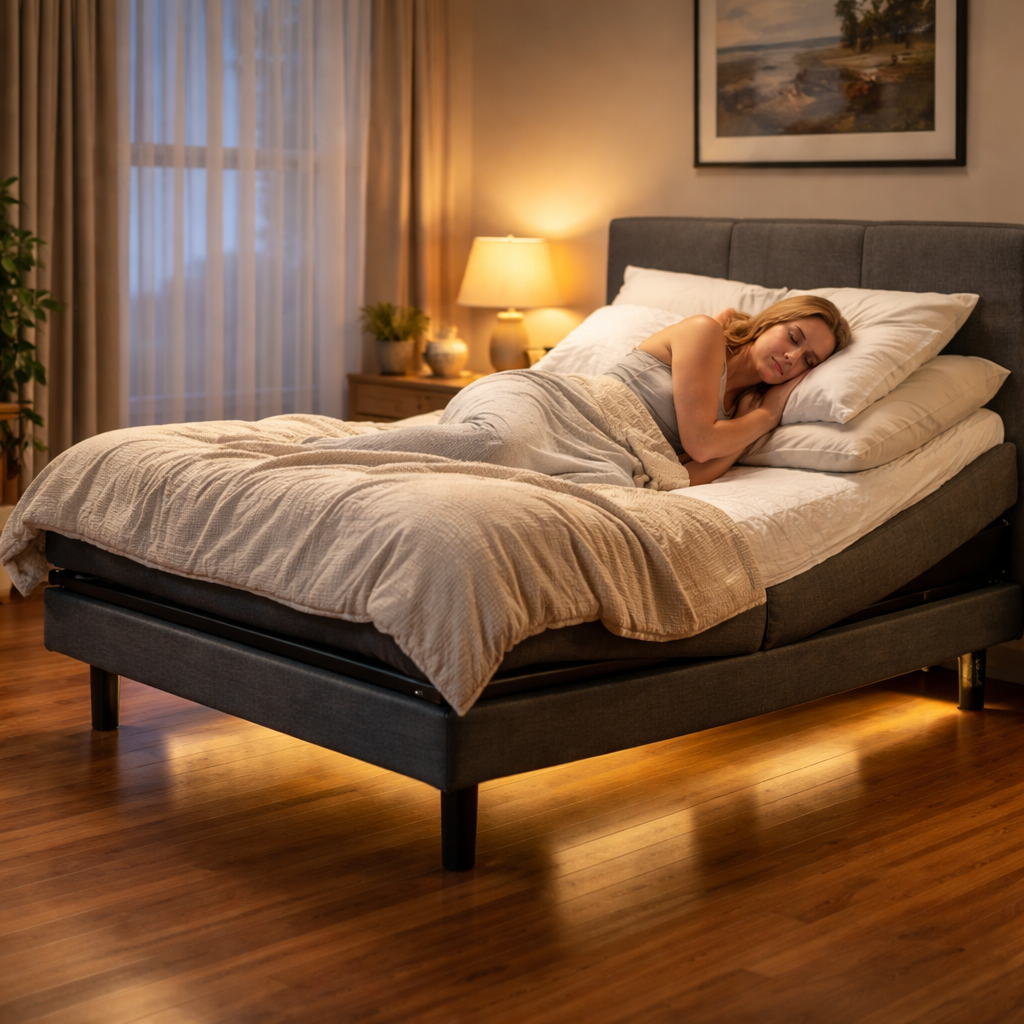
What makes an adjustable bed work for side sleepers? The magic is in the angle and the support under the shoulder and hip. A gentle head‑up tilt—about 10 to 15 degrees—opens up the chest and eases shoulder pressure, while a modest foot‑raise keeps the lower back from flattening too much. If the incline is too steep, the shoulder can dig into the mattress and the hip drops, leading to that dreaded morning ache.
Here’s a quick, three‑step test you can do tonight: first, set the head to a low incline and lie on your side. Feel whether the mattress cradles your shoulder without letting your hip dip lower than the spine. Second, switch to your back and see if the lumbar area stays level. Third, sit up and check the edge—does it feel solid enough to read a book without wobbling? If any step feels off, you probably need a mattress with a responsive comfort layer that adapts to both positions.
In our experience at Sleep Sophie, pairing a medium‑firm, responsive mattress with the right base eliminates most of those pressure points. The Choosing the Right Mattress for Side and Back Sleepers guide breaks down exactly what to look for: gel‑infused foam or hybrid coils that give a little give under the shoulder but stay firm under the hips.
Practical tips for side sleepers using an adjustable bed: use a pillow with adjustable loft so you can raise the head and still keep neck alignment; add a thin lumbar wedge under the lower back when the foot section is lifted; and keep the bed’s motor noise low—quiet motors prevent you from waking up when the base shifts during the night.
Finally, remember that comfort is personal. Keep a small notebook by the bedside and jot down how each angle feels over a week. Small tweaks—like moving the head up an extra two degrees or swapping the pillow for a slightly higher one—can turn a restless night into a truly restorative sleep.
TL;DR
If you’re a side sleeper struggling with pressure points, an adjustable bed lets you fine‑tune head and foot angles so your shoulder cradles comfortably while your hips stay aligned.
Add a medium‑firm, responsive mattress and a supportive pillow, and you’ll wake up refreshed, pain‑free, and ready to tackle the day.
Step 1: Assess Your Sleep Position and Comfort Needs
First thing’s first – ask yourself how you actually sleep. Do you drift onto your side as soon as you close your eyes, or do you flip back and forth before you settle? That little moment of recognition is the foundation of every good side‑sleeping setup, because if you don’t know your default position you can’t fine‑tune it.
Grab a notebook and jot down the angle you feel most comfortable in when you lie on your side. Most side sleepers find a gentle head‑up tilt of about 10‑15 degrees helps open the chest and eases shoulder pressure, while keeping the hips level. If the bed feels too flat, you’ll notice the shoulder digging in and the hip dropping – a classic “pinch” that leads to morning aches.
Check the shoulder cradle
Lay down on your side with the head section set to that low incline. Feel the mattress under your shoulder. It should sink just enough to cradle the joint without letting the arm flop down. A quick test: press a hand into the mattress where your shoulder sits. If it springs back in two seconds or less, you’ve got the right amount of give. If it stays indented, the surface is probably too soft for a side sleeper who also needs back‑sleep support.
Next, roll onto your back. The same mattress should keep your lower back in a neutral curve – not flat like a board, not hollow either. This dual‑position check is why we always point readers to Choosing the Right Mattress for Side and Back Sleepers. It breaks down the sweet‑spot firmness (around a 6‑out‑of‑10 medium‑firm rating) that works for both positions.
Mind the foot‑section
For many NDIS participants and seniors, the foot‑section can be a game‑changer. Raising the feet a few inches helps reduce swelling in the lower limbs and improves circulation – something we hear often from our community. If you notice your calves or ankles feeling tight after a night, try a slight foot‑up tilt and see if the discomfort eases.
While you’re tweaking angles, think about the broader bedroom environment. A sturdy, non‑slipping floor can keep the adjustable base stable, especially if you have pets or kids hopping on and off. Millena Flooring offers expert advice on flooring types that work well with electric bases, from hardwood that won’t creak to low‑pile carpet that provides a little grip.
And don’t forget the bigger picture of health. Better sleep posture often translates to better daytime energy, and pairing a solid sleep routine with proactive wellness can amplify the benefits. If you’re already seeing a health coach or physiotherapist, you might explore complementary services at XLR8well – they specialise in holistic health plans that include sleep optimisation.
Here’s a quick three‑step checklist you can run tonight:
- Set the head‑up tilt to 10‑15° and lie on your side. Does the shoulder feel gently cradled?
- Flip to your back. Is the lumbar curve neutral without a deep dip?
- Raise the foot‑section a couple of inches. Do your calves feel less tight?
If any of those steps feel off, note the exact sensation and adjust the angle in one‑degree increments until it feels right. Small tweaks – like adding an extra two degrees to the head‑up tilt or swapping a pillow for a slightly higher one – can make a massive difference.
Once you’ve nailed the angles, keep a simple log for a week. Write down the tilt you used, how your shoulder and hip felt, and any morning stiffness. Over time you’ll spot patterns – maybe a 12° head‑up tilt works best when you’re sore, or a 5° foot‑up helps with swollen ankles.
Remember, the goal isn’t to chase the perfect number; it’s to create a repeatable routine that leaves you waking up feeling rested, not sore. The combination of a well‑chosen mattress, the right adjustable‑base angles, and a supportive bedroom floor will turn that restless night into a truly restorative sleep.
Step 2: Choose the Right Mattress Compatibility
Okay, you’ve got your head‑up angle dialed in and you’re feeling the shoulder cradle. Now the real question is – does your mattress actually bend with the base, or does it fight you like an old vinyl record?
When an adjustable bed for side sleepers is paired with the wrong mattress, you’ll notice a few tell‑tale signs: a gaping seam in the middle, the mattress sliding off the frame, or that dreaded “sag‑and‑bounce” feeling when you sit up to read. Those are the moments where a night of comfort turns into a mini‑workout.
1. Look for “adjustable‑base‑friendly” construction
Manufacturers that design for flex‑ability usually avoid traditional inner‑spring coils that run the whole length of the bed. Instead, they use pocketed coils, zoned foam layers, or hybrid combos that can compress on one side without pulling the whole thing apart. The Mattress Clarity guide to adjustable‑base‑friendly mattresses highlights the Helix Midnight Luxe and DreamCloud as solid examples because their zoned support stays even when the head lifts.
In our experience at Sleep Sophie, we see the same pattern – mattresses that blend a responsive foam top with a supportive coil core tend to keep the spine aligned while still giving the shoulder a little give.
2. Target a medium‑firm feel (5‑7 on a 10‑point scale)
Side sleepers need enough plushness for the shoulder to sink, but not so soft that the hips drop lower than the spine. A medium‑firm rating hits that sweet spot. Think of it like a handshake: firm enough to feel secure, but with a gentle squeeze.
Real‑world example: Maya, an NDIS participant with chronic shoulder arthritis, switched from a 3‑star soft foam to a medium‑firm hybrid. After a week of nightly head‑up tilts at 12°, her pain score fell from 8/10 to 3/10 and she no longer needed a nightly pillow‑adjustment ritual.
3. Check edge stability – it matters more than you think
Side sleepers love to sit up and read, and many couples use the edge to slip out of bed. If the perimeter sags, you’ll feel a wobble every time you sit, and the mattress may roll off the base when you raise the head. Look for a reinforced edge or a “zone‑lite” design that keeps the outer 10‑15 cm firm.
Tip: sit on the edge for 30 seconds. If the mattress feels solid and doesn’t dip, you’ve got good edge support. If it feels like a trampoline, keep searching.
4. Prioritise breathability for those late‑night armpit sweats
Adjustable bases often raise the head, which can trap heat under the mattress. A breathable cover or gel‑infused foam layer helps regulate temperature. In a recent test, a hybrid with a cooling‑gel top stayed 2‑3 °C cooler after an hour of sleep compared with an all‑foam model.
5. Actionable checklist – run it before you buy
- Does the mattress list “adjustable‑base compatible” or “flex‑ready” in its specs?
- Is the firmness rating between 5 and 7?
- Can you press the centre and feel it bounce back in 2‑3 seconds?
- Test the edge: sit, lean, and watch for dip.
- Check for cooling features if you tend to overheat.
Jot these notes in your bedside notebook – the same place you track angle tweaks. When you revisit the mattress after a week of sleeping, you’ll instantly see if any of the boxes turned red.
6. How Sleep Sophie makes the process easier
Because we specialise in therapeutic bedding, our team can match you with a mattress that already checks these boxes. We often recommend hybrid models with zoned coil cores for side sleepers who use an adjustable base, and we’ll even arrange a home‑trial so you can confirm the fit before committing.
Bottom line: the right mattress is the missing link that lets your adjustable bed do what it’s built for – cradle the shoulder, support the hip, and stay put when you sit up. Follow the checklist, try a couple of real‑world examples, and you’ll turn those restless nights into a solid, pain‑free sleep routine.
Step 3: Select Adjustable Bed Features Tailored for Side Sleepers
Now that you’ve nailed the right mattress, it’s time to dig into the base itself. An adjustable bed for side sleepers isn’t just a motorized frame – it’s a toolbox of features that can either smooth out pressure points or create new ones if you pick the wrong settings.
Feature 1: Head‑up incline range
Side sleepers benefit most from a gentle head‑up tilt of 10‑15 degrees. Anything steeper can push your shoulder down into the mattress, turning that cozy cradle into a pin‑ching wedge. Look for a base that lets you dial the head in 2‑degree increments so you can fine‑tune the angle without guessing.
Action step: Set the head to 12°, lie on your side, and notice whether your shoulder feels supported without digging. If you still feel a “hard edge,” back off a degree and try again.
Feature 2: Independent foot‑section control
Raising the feet a few inches helps keep the hips level with the spine, which is crucial for side sleepers who otherwise risk a hip‑dip. Independent foot control means you can lift one side more than the other – handy if you share a bed with a back sleeper.
Real‑world example: Sam, a 68‑year‑old NDIS participant, set his foot section to 20° while keeping the head at 12°. Within a week his hip‑pain dropped dramatically, and he could sit up to read the morning paper without wincing.
Feature 3: Zero‑gravity preset (optional)
Zero‑gravity positions elevate the legs above the heart and tilt the head slightly, mimicking the feeling of weightlessness. For many side sleepers it reduces pressure on the shoulders and hips, especially if you have circulation issues.
Tip: Try the preset for a night and note any change in shoulder soreness. If it feels “floaty” but still supportive, add a thin lumbar pillow for extra comfort.
Feature 4: Massage zones
Gentle vibration under the shoulder or hip can soothe chronic aches. Look for at least three speed settings so you can dial back to a whisper‑quiet level for bedtime.
Our clients with arthritis often use a low‑intensity shoulder massage for 5 minutes before sleep – it’s enough to loosen the joint without waking the partner.
Feature 5: Edge‑stability lock
Side sleepers love to sit up to read, so a firm edge prevents the mattress from sliding off when you raise the head. Some bases lock the frame in place when you’re in the sitting position.
Check it: Sit on the edge for 30 seconds after you’ve raised the head. If the mattress stays flat and doesn’t wobble, the lock is doing its job.
Quick checklist before you click “Buy”
- Head‑up tilt adjustable in 2‑degree steps (10‑15° ideal).
- Independent foot‑section lift up to at least 20°.
- Zero‑gravity preset available (optional but helpful).
- At least three massage zones with a whisper‑quiet low setting.
- Edge‑stability lock or reinforced perimeter.
Putting it all together
When you combine these features with a medium‑firm, responsive mattress, you get a system that cradles the shoulder, aligns the hip, and lets you sit up without a wobble. That’s the sweet spot for anyone dealing with chronic pain, NDIS participants, or seniors who need a safe, supportive rise‑and‑fall motion.
| Feature | Why it matters for side sleepers | Pro tip |
|---|---|---|
| Head‑up incline (10‑15°) | Opens the ribcage and eases shoulder pressure | Use 2° increments to find your personal “just right.” |
| Independent foot lift | Keeps hips level, prevents hip‑dip | Start at 15°, adjust up to 25° if hips still feel low. |
| Edge‑stability lock | Ensures the mattress stays put when you sit up to read | Sit for 30 seconds after each angle change to test. |
In our experience at Sleep Sophie, the most satisfied side‑sleepers are the ones who treat the base like a set of tiny levers – each adjustment is a small experiment, not a permanent decision. Keep a simple log on your nightstand: angle, comfort rating, any pressure points. After a week you’ll have a data‑driven map of what works best for your body.
So, grab that remote, start with a modest 12° head‑up, add a 20° foot lift, test the edge, and give the massage a gentle 30‑second run‑through. You’ll soon discover the perfect combination that turns restless nights into restorative sleep.
Step 4: Optimize Bed Settings for Spinal Alignment
Now that you’ve logged your favorite head‑up and foot‑lift numbers, it’s time to fine‑tune those settings so your spine stays neutral from ear to toe.
What most side‑sleepers forget is that the angle isn’t a set‑and‑forget knob – it’s a series of tiny levers you can adjust night after night as your body shifts.
Head‑up Angle: The Sweet Spot
Start with a gentle 10°–15° incline. Anything steeper pushes your shoulder down into the mattress, while anything lower leaves your ribcage compressed.
- Raise the head in 2° increments using the remote.
- After each change, lie on your side for 2‑3 minutes and note whether your shoulder feels cradled without a hard edge.
- Record the angle that gives a smooth “hug” around the shoulder and a straight line from the neck to the hips.
In our experience, most chronic‑pain clients settle on 12°–14°. If you have a higher‑loft pillow, you may need to dial back a degree to keep the neck in neutral alignment.
Foot‑section Lift: Keeping the Hips Level
The foot lift does more than raise your legs – it stops the dreaded hip‑dip that forces the spine into a C‑shape.
- Start at 15° and gradually increase to 25°.
- Feel for a level line from the hip joint to the lower back; you shouldn’t notice a sagging side.
- If your hips still feel low, add a thin lumbar wedge under the lower back while keeping the foot angle steady.
Real‑world example: Sam, a 68‑year‑old NDIS participant, lifted his foot section to 22° and added a 2‑inch lumbar pad. Within a week his hip‑pain dropped from a 7/10 to a 2/10.
Zero‑gravity and Contoured Positions
Many side‑sleepers swear by the zero‑gravity preset because it lifts the head and feet just enough to create a 120° bend at the hips, spreading weight evenly across the mattress. If you’re new to it, hit the button, stay in the position for a full night, and watch whether your shoulder pressure eases.
Another favorite is the gentle “contoured” setting – a modest head‑up (≈10°) paired with a low foot‑lift (≈5°). This creates a natural curve that supports the hips and bottom without over‑elevating the shoulders. The same Zinus guide notes that a contoured position can help side sleepers keep the spine aligned while still enjoying a cosy cradle.
Edge‑stability Check
Side‑sleepers love to sit up and read, so a wobbly edge turns a relaxing moment into a mini‑workout. Here’s a quick test:
- Raise the head to your chosen angle.
- Sit on the edge for 30 seconds. The mattress should feel firm, not like a trampoline.
- If you feel any dip, look for a base with an edge‑stability lock or consider a mattress with reinforced edges.
When the edge stays solid, you’ll notice less shifting when you move from lying to sitting – a big win for seniors and anyone with limited mobility.
Putting It All Together: A Quick Checklist
Before you call it a night, run through this 30‑second sanity check. Grab your notebook and tick each box.
- Head‑up angle between 10°–15°? ✅
- Shoulder feels cradled, no hard edge? ✅
- Foot lift keeps hips level (no dip)? ✅
- Zero‑gravity or contoured mode feels neutral? ✅
- Edge stays firm when you sit up? ✅
- Any extra lumbar or wedge support stays in place? ✅
If you hit every check, you’ve built a custom‑fit spinal alignment system that works for side sleepers of all ages, from chronic‑pain sufferers to elderly users needing extra safety.

Remember, the perfect settings aren’t set in stone. As you age, recover from injury, or simply change your bedtime routine, revisit these levers and adjust by a degree or two. Small tweaks today can prevent a sore back tomorrow, and that’s the real power of an adjustable bed for side sleepers.
Step 5: Maintenance and Longevity Tips
You’ve nailed the angles, paired the right mattress, and now your adjustable bed for side sleepers feels like a custom‑made sleep cradle. The next question most people forget is: how do you keep that magic working night after night?
Regular visual checks – the 5‑minute habit
Just like you glance at the oil level in a car, give your base a quick once‑a‑month inspection. Look for loose bolts, wobbly screws, or frayed cords. Tightening a stray nut takes less time than a night of noisy motor whirrs.
Pro tip: set a reminder on your phone for the first Saturday of each month. When you pull the cover off, give the frame a gentle shake. If anything rattles, tighten it right then.
Weight limits aren’t suggestions
Adjustable bases have a maximum recommended load – many Australian models are rated up to 750 lb, but it varies. Exceeding that limit stresses the motors and shortens the lifespan. If you share the bed with a partner, a pet, or use a heavy mattress topper, add the weights together and compare them to the spec sheet.
When in doubt, stay on the safe side. A few extra pounds can be the difference between a smooth glide and a motor that stalls after a year.
Keep dust and debris at bay
Dust loves to settle around the moving rails. Every 2‑3 months, unplug the base, vacuum the crevices with a soft brush attachment, and wipe the exterior with a damp cloth. It takes a minute, but it prevents the motor from having to work harder – and a quieter bed means better sleep for you and anyone nearby.
Mind the moisture
Electronics and liquids don’t mix. Spills from a bedside glass, humidity from a bathroom door, or even sweat can corrode the internal components. Use a waterproof mattress protector and keep drinks off the headboard area. If a spill does happen, dry the surface immediately and let the base air out before plugging it back in.
Remote care – treat it like a fragile glass
The remote is the most used part of the system, yet it’s the easiest to drop. Store it in a bedside drawer or a soft holder. A cracked remote can send erratic commands that confuse the motor, leading to premature wear.
Gentle usage – no step‑stool tricks
It’s tempting to use the raised head‑section as a makeshift seat or step stool, especially if you have limited mobility. Resist the urge. Supporting your weight on the edge bends the frame and can cause the rails to warp over time. Instead, keep a sturdy footstool or chair nearby for getting in and out of bed.
Annual professional tune‑up
Even with diligent DIY care, a yearly visit from a qualified technician can spot wear that the naked eye misses – like motor fatigue or hidden wiring fatigue. Think of it as a health check for your bed; the cost is tiny compared with replacing the whole unit.
Quick maintenance checklist
- Inspect bolts & screws – tighten if loose.
- Vacuum rails and wipe down surfaces.
- Confirm you’re under the manufacturer’s weight limit.
- Protect against spills with a waterproof cover.
- Store the remote safely to avoid drops.
- Avoid sitting on the edge or using the bed as a step.
- Schedule a professional service once a year.
Following this list keeps the mechanical parts humming, the motors quiet, and the sleep experience consistent for years.
Real‑world example: Sam’s senior‑care routine
Sam, an 72‑year‑old NDIS participant, uses an adjustable bed for side sleeping because his shoulder arthritis needs that gentle head‑up tilt. He noticed a faint grinding sound after six months. He did the 5‑minute inspection, found a loose foot‑rail screw, tightened it, and the noise vanished. He now adds a quarterly vacuum session to his routine and hasn’t had another issue in two years.
His story shows how a few minutes of attention can save thousands in repairs and keep the bed supportive for his chronic‑pain needs.
Why Sleep Sophie makes maintenance easy
Our Australian‑based support team offers a complimentary inspection guide with every purchase, walking you through each of the steps above. If you ever feel stuck, a quick call connects you with a certified sleep consultant who can arrange a technician visit.
In short, treat your adjustable bed for side sleepers like any prized piece of furniture: clean it, check it, respect its limits, and it will reward you with years of pain‑free, restorative sleep.
Conclusion
We’ve walked through how a few degree tweaks, the right mattress, and a bit of regular care can turn an adjustable bed for side sleepers into a nightly therapist.
So, what’s the next step for you? Grab a notebook, note the head‑up angle that cradles your shoulder, and test the foot lift until your hips sit level. If the mattress feels too soft or the edge wobbles, remember the quick checklists we shared – they’re your shortcut to painless adjustments.
For anyone dealing with chronic pain, NDIS participants, or seniors who need a safe rise‑and‑fall, those tiny habits add up to fewer morning aches and a longer‑lasting bed.
And don’t forget the maintenance loop: a five‑minute monthly inspection, a gentle vacuum of the rails, and a yearly technician visit keep the motors humming quietly.
When you treat your adjustable bed like a piece of furniture you’d love to keep, the payoff is simple – more restorative sleep, fewer doctor visits, and a bedroom that feels truly yours.
Ready to make the change? Start tweaking tonight and experience the difference a well‑tuned adjustable bed for side sleepers can bring to your sleep routine.
Remember, the best setup evolves with you – revisit your angles after a few weeks or whenever your health changes, and adjust accordingly. Small refinements now mean big comfort gains later.
FAQ
Can I use an adjustable bed if I’m a side sleeper with chronic shoulder pain?
Yes, you can. Raising the head section just a few degrees opens up the rib cage and reduces the pressure on the shoulder joint. In our experience, a 10‑15° incline combined with a medium‑firm mattress gives the shoulder a gentle cradle while keeping the hips level. Pair it with a supportive side‑cube pillow and you’ll notice less night‑time tossing. Start with a 2‑degree increase, note how your shoulder feels after a night, and fine‑tune from there.
What head‑up angle is ideal for most side sleepers?
Most side sleepers feel most comfortable with a head‑up tilt between 10° and 20°. Anything below 10° often leaves the shoulder flat against the mattress, while angles above 20° can push the head forward and strain the neck. A good rule of thumb is to begin at 12°, sleep a few nights, and then adjust in 2° increments until you get a “hug” around the shoulder without a hard edge. Keep the foot section low unless you need extra hip support.
Do I need a special mattress for an adjustable bed?
Yes, the mattress should be “adjustable‑base‑friendly”. Look for pocketed coils or zoned foam that can bend without creating a seam in the middle. A medium‑firm hybrid works well because the foam top gives the shoulder a little give, while the coil core holds the hips in line. If the mattress slides or the edges sag when you raise the head, it’s not the right match and you’ll lose the comfort benefits you’re after.
How can I prevent the pillows from sliding off when the bed is tilted?
Start with a firm “foundation” pillow that sits flush against the headboard; it acts like a base that won’t wander. Add a softer comfort pillow on top and, if you like hugging, a side‑support cube that slots into the gap between your arm and shoulder. A thin non‑slip strip or a bamboo cover on the foundation pillow adds just enough texture to keep the stack in place even when the motor hums.
Is a zero‑gravity setting useful for side sleepers?
Zero‑gravity lifts the head about 15° and the feet around 30°, creating a weight‑distribution that mimics the feeling of floating. For many side sleepers it eases pressure on both shoulder and hip because the body forms a gentle “U” shape. Try it for a full night and see if the “floating” sensation reduces any aches you usually wake up with. If it feels too steep, dial the head back down a couple of degrees and keep the foot lift modest.
How often should I revisit my angle settings?
Our experience shows that your body changes—whether you recover from an injury, your arthritis flares, or you simply get used to a new mattress. A quick 30‑second check every few weeks works well: raise the head to your current setting, lie down for two minutes, and note any new pressure points. If you notice a shift, adjust by 1‑2° and give it another night. Seasonal changes, like a cooler winter bedroom, can also affect how you prefer the tilt.
What maintenance tips keep an adjustable bed performing well for side sleepers?
Treat the base like any other piece of furniture. Do a five‑minute visual inspection once a month—tighten loose bolts, vacuum the rails, and wipe down any dust. Stay under the manufacturer’s weight limit; extra weight on a mattress or a heavy topper can strain the motors. Keep liquids away from the headboard and use a waterproof mattress protector. Finally, schedule a professional service at least once a year so any hidden wear is caught before it becomes a noisy problem.