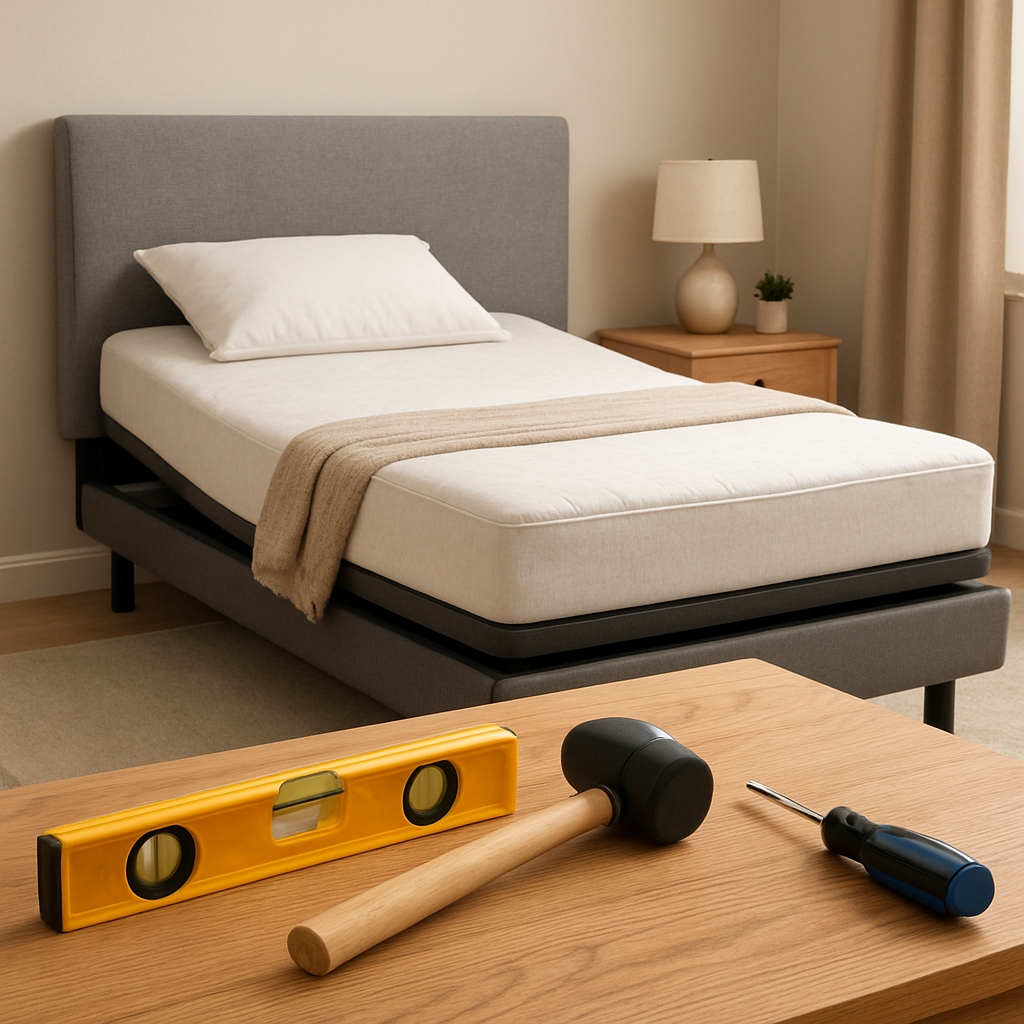
Ever tried to hang a headboard on an adjustable bed and felt stuck? You’re not alone. The extra weight and moving parts can make it feel like a DIY disaster.
The trick isn’t about hammering through studs, it’s about respecting the bed’s frame, the motor, and your own comfort. If you skip a step you risk wobble or, worse, a slipped headboard.
Here’s a quick play‑by‑play so you can keep the headboard steady and still enjoy the full benefits of a motorised base.
Step 1: Check the base’s mounting points. Most adjustable bases use a simple 4‑point rail system that sits under the mattress. Make sure the rail is level and all screws are snug before you even touch the headboard.
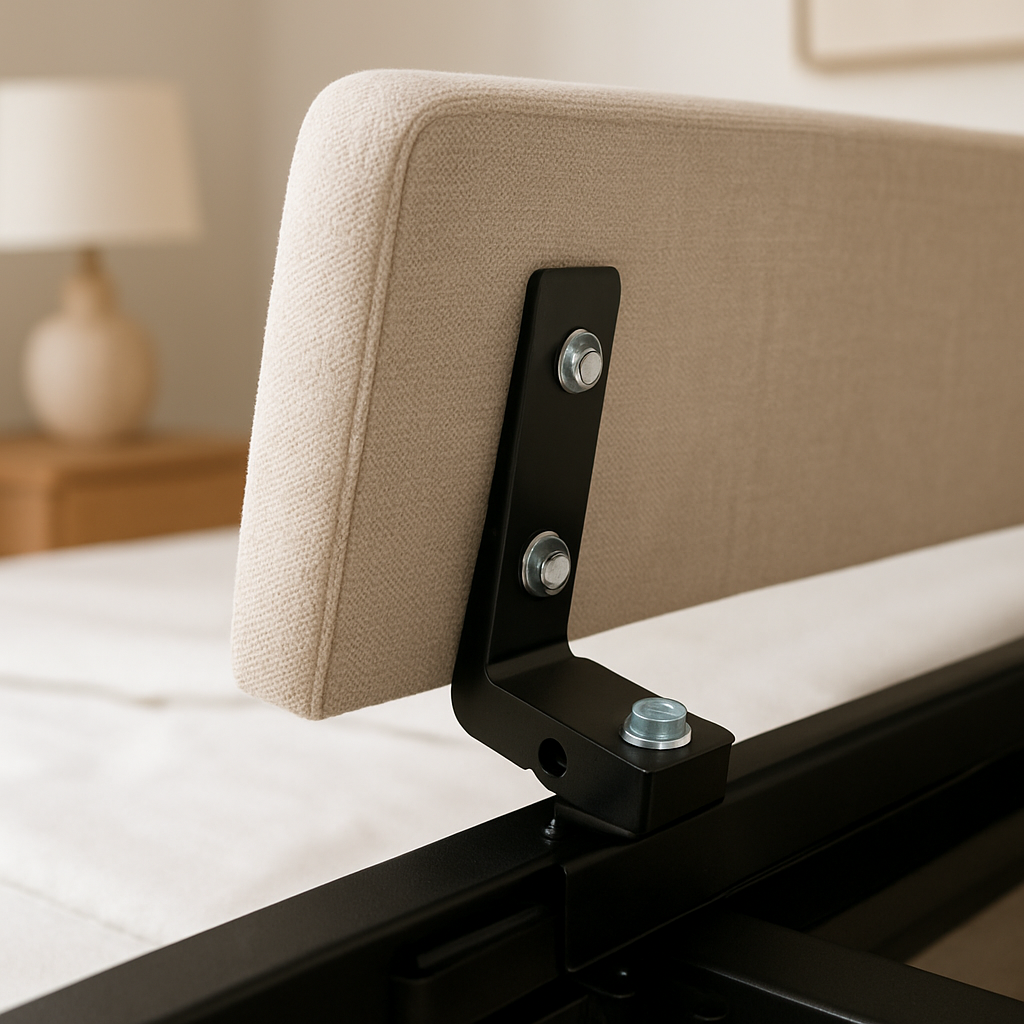
Step 2: Align the headboard’s mounting plate with the rail. Most headboards come with a removable plate that snaps into the rail’s slots. Slide the plate over, line up the holes, and gently tap it in with a rubber mallet to avoid damaging the finish.
Step 3: Secure the headboard with the included bolts. Tighten each bolt clockwise until you feel resistance, but don’t over‑tighten – you don’t want to strip the threads or crush the upholstery. A torque screwdriver can help keep the tension even.
If you’re a caregiver or someone with limited mobility, a lightweight headboard with a locking rail can be a lifesaver. Imagine the relief of not having to lift a heavy frame every time you adjust the bed’s angle.
Quick tip: Keep a small screwdriver or Allen key handy while you’re on the bed. This way, if the motor pauses during the process, you can adjust the bolts on the spot without a full power‑off.
When in doubt, refer to a guide on choosing the right adjustable bed base – it’ll give you a solid foundation to start from. How to Choose an Adjustable Bed Base Australia: A Practical Guide covers the rail specs and weight limits in detail.
Once the headboard is nailed, don’t forget to test the bed’s motor at a low setting. A quick lift and lower will confirm the headboard stays firm. And if you’re looking for an extra layer of sleep‑support, try pairing earplugs for noise reduction – they’re surprisingly effective for side sleepers and help you drift into deeper rest.
With the headboard in place and the motor humming, you’re ready to enjoy a truly supportive, pain‑relieving sleep experience. Keep your tools handy, follow the steps, and let your bed do the heavy lifting.
TL;DR
Want a quick cheat‑code for how to attach headboard to adjustable base? Grab a lightweight headboard, line up the mounting plate, then tighten the bolts—no heavy lifting required. Once secured, test at low motor settings to confirm stability, and you’ll enjoy a pain‑free sleep setup that’s ready for therapeutic need.
Step 1: Gather Tools & Materials
Before you even think about screwing in that headboard, pause for a second and ask yourself: Do I have everything I need? A quick inventory now saves a pile‑of‑tools scramble later and keeps the process smooth, especially if you’re juggling a motorised bed’s delicate mechanics.
Here’s a simple list to run through. If something feels missing, grab it before you lift anything. Tools:
• Adjustable wrench or socket set (to fit the bolts that lock the headboard in place)
• Phillips or flat‑head screwdriver (depending on the fastener style)
• Rubber mallet (to tap the mounting plate without nicking the finish)
• Level (to verify the rail’s flatness and keep the headboard perfectly vertical)
• Measuring tape (to double‑check clearance between frame and bed)
Materials:
• Replacement bolts or nuts, if the original set is worn
• Silicone caulk (just a dab to seal any gaps and prevent squeaks)
• Protective cloths or padding (to keep the mattress and bed frame dust‑free while you work)
Got everything? Great. If not, take a quick walk to the nearest hardware store or online shop and stock up. Don’t rush—this is the foundation for a stable, safe headboard that won’t wobble when the motor shifts angles.
Now, a quick video to walk you through a typical attachment scenario. It’ll show you how to line up the mounting plate, what the right torque feels like, and how to test the fit without pulling the entire bed out of the room.
Seeing it in motion helps, but visual aids aren’t the only trick. Take your time, let your hands guide you, and remember that the goal is to keep the headboard level and secure while respecting the motorised base’s hidden rail system.
One tip that often trips people up: the bolts on adjustable beds are sometimes long enough to thread through the frame and into the rail. When you’re tightening them, feel the snugness but don’t push past the point where the threads stop biting. Over‑tightening can damage the rail or strip the threads, causing future headaches.
If you’re wondering about the science behind headboard stability, a fascinating read explains how cannabinoids can improve sleep quality and reduce discomfort. Check out this guide on THC and sleep benefits for a deeper dive.
And if ergonomic design matters to you—whether you’re a caregiver or someone who spends a lot of time in bed—consider exploring Rivaprime’s lineup of assistive furniture. Rivaprime offers solutions that pair well with motorised beds to enhance comfort and support.
Now, let’s break it down into a quick, repeatable checklist you can follow:
- 1. Turn off the bed’s power and ensure the motor is at a neutral position.
- 2. Lay the protective cloths over the bed frame to shield it from scratches.
- 3. Hold the headboard with one hand and use the adjustable wrench to lightly loosen the mounting bolts.
- 4. Slide the mounting plate onto the rail, aligning the holes.
- 5. Use the rubber mallet to tap the plate into place, keeping a light touch.
- 6. Tighten each bolt clockwise with the screwdriver, checking for uniform tightness.
- 7. Apply a thin bead of silicone caulk along the edge if there’s a visible gap.
- 8. Use the level to confirm the headboard’s vertical alignment.
- 9. Power the bed back on and run a low‑speed motor test to see if the headboard stays firm.
- 10. Store your tools in a convenient spot—don’t leave them scattered around the room.
With these tools, materials, and steps in hand, you’re set to attach the headboard without a hitch. Keep a steady rhythm, trust your measurements, and the motorised base will do the heavy lifting while you focus on comfort.
Step 2: Position the Adjustable Base
First, give the base a quick once-over. Check that the top rail is level – a wobbly rail is like a crooked line on a map; the whole journey will be off.
Next, lift the head of the bed. Most motors allow you to raise the head to a comfortable angle with a simple push of a button or a tap on the remote.
Now, line up the headboard’s mounting plate with the rail’s slots. If your base came with built‑in brackets, they’ll sit snugly into the rail. If you’re using a separate bracket kit, make sure the holes on the plate line up with the bracket’s screw holes. A quick visual test – give the plate a gentle tap with a rubber mallet. You should feel a slight give, not a harsh clang. this short video demonstrates the right angle.
Do you notice the gap between the back of the headboard and the top rail? That’s an important spot. Leave 1½ to 2 inches of clearance so the mattress can slide freely when you tilt the bed. If the gap is too small, you’ll feel resistance when you lift the head, and the motor could strain. If it’s too wide, the headboard will wobble like a loose picture frame.
Measure the distance between the mounting holes on the headboard and the bracket. If they don’t match, slide the headboard until they do. Then, secure the headboard by tightening the bolts. Don’t over‑tighten – you want a firm hold, but you don’t want to strip the threads or crush the upholstery. A torque screwdriver helps keep the pressure even.
After the bolts are snug, lower the bed back to a flat position. This lets you double‑check that the 1½‑2 inch clearance still exists. If you’re setting the bed up in a room with small children, make sure there’s no more than 1–3 inches of space between the mattress surface and the bottom of the headboard – a safety measure that keeps curious little ones from getting stuck.
One trick that Sleep Sophie customers swear by is using a helper or a clamp. The helper keeps the headboard steady while you line up the holes. A clamp works just as well if you’re doing it solo. The extra support means you can focus on tightening the bolts without worrying about the board wobbling.
What about those who prefer a “floating” headboard? That’s a whole different ballgame. A floating headboard sits on the wall and doesn’t need to match the base. It gives you freedom to swap boards whenever you feel like a change of décor. But if you’re happy with a fixed headboard, the steps above will give you a solid, stable base that can handle whatever the motor throws at it.
So, what’s the next move? Test the motor at a low setting. Raise and lower the head a few times to ensure the headboard stays in place. If everything feels smooth, you’re ready to enjoy a pain‑free, supportive sleep experience.
Want more tips on how to keep the fitted sheets snug on an adjustable bed? Check out our guide on keeping fitted sheets in place for a tidy look and consistent support throughout the night. this detailed guide video gives step‑by‑step tips.
Step 3: Attach the Headboard with Fasteners (Video)
We’re now at the moment the headboard is in front of you, the bolts are in hand, and the bed is ready to play its part. The last stretch of work feels like tying the knot of a big project, so let’s walk through it step by step, just as the video does, but in a way that lets you keep the bed’s motor at bay while you tighten things up.
Quick sanity check
Before you start screwing, take a breath. Stand back and eyeball the alignment. The headboard’s mounting plate should sit flush against the top rail. If you see a gap wider than about two inches, the board might shift as the motor moves. If it’s too tight, you risk forcing the bolt threads.
Ask yourself: “Is the headboard sitting evenly?” If you can see a subtle wobble, pause. A tiny shim or a second helper can lock it into place.
Step‑by‑step fastening
1. Thread the bolts: Start with the lower bolt on each side. Turn it clockwise until it’s snug, but not over‑tightened. You’ll feel a gentle resistance and the headboard should no longer budge.
2. Upper bolt: Now do the same for the top bolt. Use a torque screwdriver if you have one—most models recommend 10 Nm for standard heads. If you’re on a budget, a good Allen wrench will do. The goal is even pressure, not a tight‑as‑possible grip.
3. Check for play: Give the headboard a gentle push from the side. If it flexes, you need a tighter lock. If it feels solid, you’re good.
4. Re‑test the motor: Switch the bed to a low setting, raise the head, and then lower it. Watch the headboard for any slip or wobble. If everything stays put, you’ve nailed the job.
Special tricks for the common pain points
People with chronic pain often worry that a tight headboard could compress their back or cause the motor to strain. A trick I’ve seen work is to leave the first bolt a fraction of a turn loose, then tighten it again after the motor runs a cycle. The motor’s movement loosens the threads a little, and a second tightening locks the board in place without crushing the upholstery.
For NDIS participants who might be adjusting the bed from a seated position, using a clamp on the bed’s back frame keeps the headboard steady while you screw. A simple kitchen clamp on the rail is enough to take the load off your hands.
If your headboard has a decorative metal trim, remember to use washers to keep the screws from pulling through the finish. It also keeps the fastener head flush so the upholstery stays neat.
Quick reference table
| Item | Tool/Action | Key Tip |
|---|---|---|
| Lower bolt | Allen wrench (5–6 mm) | Start loose, tighten to snugness |
| Upper bolt | Torque screwdriver (10 Nm) | Even pressure, avoid over‑tightening |
| Washers | Include on all screws | Prevents finish damage |
| Motor test | Low setting, raise/lower | Check for wobble before final use |
Once you’re satisfied with the snugness and the motor runs smoothly, the headboard is ready to support your nightly routine. Take a moment to sit back, stretch a bit, and feel that solid connection. You’ve just turned a potentially tricky task into a straightforward routine—thanks to a bit of patience and a few handy tools.
Want a deeper dive into how the headboard can enhance your comfort? For example, how pillow placement can work with your new setup, check out How to Position Pillows on Adjustable Bed for Maximum Comfort and Support. That guide walks through the exact angles and pillow types that pair best with a secure headboard.
Step 4: Secure the Headboard to the Base
Now that the headboard sits on the rail, it’s time to lock it down. Think of this like tying a kite to a tree – a little tension and everything stays steady.
First, double‑check that every screw hole on the headboard aligns with the corresponding slot on the rail. If there’s a tiny mis‑alignment, give the board a gentle nudge until the holes sit flush. A mis‑fit here can cause a wobble later when the motor moves.
Place a washer on each screw before tightening. Washers spread the load and keep the finish from cracking. If your headboard has a metal trim, this extra step prevents the screws from digging into the edge.
Turn on the motor to the lowest setting and gently lift the head. Keep an eye on the bolts as the bed flexes – that’s the moment to catch any play before it becomes a problem.
Start with the lower bolt on one side. Turn it clockwise just enough to feel resistance, then give it a half‑turn. Repeat on the opposite side. This balanced approach prevents the headboard from tilting.
Next, tighten the upper bolt on each side. If you have a torque screwdriver, set it to 10 Nm as many manufacturers recommend. If you don’t, just keep tightening until the headboard feels solid and the bolt shank stops turning. Remember, a snug lock is good, an over‑tight lock can crush the upholstery.
After the bolts are snug, give the headboard a quick side push. If it flexes, tighten the lower bolts a little more. If it stays firm, you’re good to go.
Run the motor up and down again. Watch for any movement. If the headboard shifts, pause, readjust, and re‑tighten. This quick test saves you from future headaches.
In our experience, caregivers who follow this step‑by‑step routine find the setup stays stable for months, even with frequent angle changes. It’s a small effort that pays off in smooth, worry‑free nights.
For those who want a ready‑made bracket that matches most Australian adjustable beds, you can check out the TOPTGO Headboard Bracket Kit on Amazon. It comes with all the washers and a clear size chart, making the install a breeze.
Take a moment to breathe. You’ve just turned a technical step into a simple, repeatable habit. Now the headboard will stay put every time you raise the bed, letting you focus on what matters most: a restful sleep.
If you’re working with a senior who needs extra stability, consider installing a small locking plate under the headboard. It sits just above the rail and holds the board in place even when the motor’s torque is high. A few extra screws can make the difference between a wobble and a solid rest.
Step 5: Verify Stability and Adjust
Now that the headboard is sitting on the rail, the real test begins. We’re not just looking for a tidy look; we’re looking for a bed that won’t wobble when you change positions.
First, let’s do a quick visual check. Line up the bolt holes again, then give the headboard a gentle tap from the side. If there’s any give, tighten a few turns and re‑test.
Next, run the motor on the lowest setting. Raise the head a few times, then lower it back. Watch for any movement—no shudder, no tilt, just a firm, steady position.
Did you know that a tiny misalignment can cause a whole night of shifting? Even a quarter‑inch of play can make pillows slide off or the bed feel loose. That’s why a quick motor test after every bolt adjustment is a game‑changer.
Use Washers and Locking Plates
Washers spread the load across a larger area, preventing the bolts from pulling through the headboard frame. They also keep the screw heads flush, so your upholstery stays smooth.
For seniors or people with arthritis, a small locking plate under the headboard can add extra peace of mind. The plate sits just above the rail and holds the board in place even when the motor’s torque spikes. A few extra screws can make the difference between a wobble and a solid rest.
In a real‑world example, one caregiver for an elderly patient used a locking plate on a 75‑mm thick headboard and found the bed stayed perfectly level throughout the night. The patient reported no new back pain after the adjustment.
Fine‑Tuning with a Torque Screwdriver
If you have a torque screwdriver, set it to the manufacturer’s recommended value—most panels call for around 10 Nm. This keeps the pressure even across all bolts.
When you’re on a budget, a good Allen wrench does the job too. Just remember to tighten each bolt to snugness, then give the headboard a quick side push. If it still flexes, add a half turn.
Another tip: keep the motor off when you’re tightening the upper bolts. This reduces the chance that the headboard will shift while you’re working.
Check Clearances and Wall‑Space
Measure the gap between the back of the headboard and the mattress. A clearance of 1½ to 2 inches allows the mattress to slide freely when you tilt the bed.
If the gap is too narrow, the mattress can bind and strain the motor. Too wide, and the headboard will wobble like a loose picture frame.
For NDIS participants who need to adjust the bed from a seated position, ensure there’s enough space on either side of the bed. A 3‑inch clearance prevents the headboard from scraping the wall or a nearby nightstand.
Real‑World Testing Scenarios
Imagine an older adult who loves reading in bed. They lift the head to 45° and rest a book on a side table. After a test run, they notice the headboard remains level, giving them a comfortable reading nook.
A caregiver for a person with chronic pain might test the bed at 30° and then at full recline. They observe that the headboard stays anchored, reducing the risk of back strain when the patient settles into a supportive position.
For a NDIS participant who frequently changes the bed angle, a quick motor test after every change confirms the headboard’s stability and keeps the user safe.
When Things Go Wrong
If you notice wobble after a motor cycle, first check the bolts. A slightly loose lower bolt can cause a ripple effect when the base moves.
Re‑tighten the bolt, then re‑test. If wobble persists, add a washer to the top bolt to redistribute pressure.
In rare cases, the bed’s rail may have a minor defect. If tightening bolts doesn’t help, contact the manufacturer for a replacement rail.
Final Checklist Before You Sleep
• Verify bolt tightness with a torque screwdriver or Allen wrench.
• Run the motor through a full cycle at low, medium, and high settings.
• Confirm the headboard remains level and no part flexes.
• Ensure a 1½–2‑inch clearance between mattress and headboard.
• Install a locking plate if you’re in an elder‑care setting or if you have mobility issues.
• Store your tools in a small box nearby for quick adjustments.
Once the headboard holds firm across all angles, you’ve turned a potential nightmare into a simple, repeatable habit. You can now focus on the comfort and support your body deserves, knowing that the bed will stay stable no matter the position.
For a deeper dive into headboard styles that pair well with adjustable beds, the guide at Urner’s headboard guide offers a range of options and compatibility tips.
Step 6: Maintenance & Care Tips
Now that your headboard is hanging solid, it’s time to keep it that way. Think of maintenance like brushing your teeth—skip it, and the whole system starts to feel rough.
Check the Bolts Every Few Months
Grab the Allen wrench you used during installation and run through each bolt. A quick turn should feel snug, not like a loose screw. If you hear a little give, tighten by a half turn and test again.
For people who adjust the bed often—especially those with chronic pain or caregivers who help elders—slight loosening can happen faster. A quick monthly check prevents wobble when the motor is working hard.
Keep the Clearance Consistent
The gap between the headboard and mattress should stay between 1½ and 2 inches. Measure it with a ruler or a simple tape measure after you’ve adjusted the bed to its highest setting. If the space shrinks, the mattress can bind the headboard, causing strain on the rail.
In a busy home, dust can settle in that gap, too. A quick wipe‑down with a dry cloth every few weeks keeps the area free of debris and preserves the smooth sliding of the mattress.
Lubricate the Rail (When Needed)
Most adjustable bases come with a lubricated rail, but the oil can dry out over time. If you notice a click‑clack noise when the bed moves, apply a very light coat of silicone spray to the rail. Avoid over‑lubrication; a damp feel can attract dust.
Use the spray at eye level, rotate the base a couple of times, and wipe off any excess. This simple step keeps the motor’s strain low and extends the life of the frame.
Clean the Headboard and Frame
Every few weeks, wipe down the headboard’s surface and the metal rail with a damp microfiber cloth. If the headboard is upholstered, spot‑clean with a mild, non‑abrasive cleaner. For a wooden finish, a quick polish with a wood‑safe product keeps the grain looking fresh.
Dust on the bolts or washers can loosen them over time, so make sure you’re wiping that area as well.
Quick Maintenance Checklist
- Monthly bolt torque check
- Quarterly clearance measurement
- Bi‑annual rail lubrication
- Monthly surface wipe‑down
Doing these few quick checks will keep the headboard secure for years, especially for NDIS participants who rely on smooth bed adjustments or for caregivers looking to minimise effort.
If you’re ever in doubt, a quick search of a headboard compatibility guide can refresh your memory on how to attach headboard to adjustable base and confirm your setup’s integrity.
FAQ
How do I check if my adjustable base has the right mounting points for a headboard?
The first thing to do is pull the base’s owner’s manual or look for a quick photo of the rail. Most Australian adjustable bases have a 4‑slot channel that runs under the mattress. Measure the distance between the slots and compare it to the spacing on the headboard’s mounting plate. If they match, you’re good to go. If they don’t, you’ll need a bracket that bridges the gap or a different plate design.
What tools are essential for attaching a headboard without damaging the motor?
You won’t need a fancy power drill, just a set of 5‑mm to 6‑mm Allen wrenches, a Phillips screwdriver, and a small torque wrench if you’re feeling precise. A rubber mallet is handy for snapping the plate into the rail without scratching the finish. Keep a small towel or cloth handy to wipe away any silicone spray or dust. The goal is to keep the motor’s moving parts clean and the headboard’s bolts snug without over‑torquing.
How do I ensure the headboard sits level and won’t shift when the bed moves?
Leveling is all about the rail. Once the headboard is on, gently press the back edge against the top rail and feel for a straight line. A quick tool called a carpenter’s level can confirm it. If you see a small tilt, slide the board a millimetre or two and tighten the lower bolt again. The key is to get the headboard sitting flush; once the motor lifts, a tiny play can turn into a wobble.
Can I use a headboard with a lock‑rail system if my base doesn’t have built‑in brackets?
A lock‑rail headboard is a great workaround if your base didn’t ship with built‑in brackets. The lock‑rail clamps onto the top rail and gives you a stable mounting point. You’ll still need to screw the headboard’s plate into the lock‑rail, but the clamp takes most of the load, so you won’t have to force the plate into a tight slot. It’s especially handy for NDIS participants who need a low‑profile solution.
What maintenance steps should I do after installing to keep it stable long term?
After installation, keep a simple routine. Every month, give each bolt a quick turn‑check with a torque wrench to make sure it’s still snug. Once a quarter, measure the clearance between the headboard and mattress; it should stay 1½ to 2 inches. Bi‑annually, give the rail a light silicone spray and wipe away dust. A tidy surface means the motor can glide smoothly, and the headboard stays in place.
How do I know if the bolts need tightening after a few months of use?
If the headboard feels a little loose after a few months, it’s usually the lower bolts that loosen first. Turn each one counter‑clockwise a quarter turn, then let the bed sit for a day. Next, tighten them again with your wrench. If you still notice a bit of movement, add a washer on the screw head to spread the load. This small tweak keeps the whole assembly firm without crushing the upholstery.
Conclusion
We’ve walked through every bolt, every check, and every little tweak you’ll need to make your headboard sit just right on an adjustable base. The goal? A steady, pain‑free platform that stays locked no matter how many times you flip the bed.
First, keep a simple routine: a monthly torque check, a quarterly clearance measurement, and a quick test of the motor at low settings. That rhythm turns a technical task into a habit you won’t have to remember each night.
Second, listen to what the bed is telling you. A little wobble after a lift? Tighten the lower bolts again and add a washer if the headboard’s finish is delicate. For NDIS participants or caregivers, a locking plate can give that extra peace of mind.
Finally, remember that the headboard isn’t just a piece of wood; it’s the first line of comfort in your sleep routine. If you find yourself still unsure, reach out to a local Sleep Sophie store. We’re here to help you fine‑tune every angle, so you can fall asleep knowing the bed is secure and supportive. Trusting the bed to hold steady lets you focus on the rest of your day—whether it’s a work call, a workout, or simply savoring a quiet evening.